Author name: admin

A damaged roof with missing shingles.
Emergency Roofing Repairs

How Long Does Storm Damage Restoration Take?

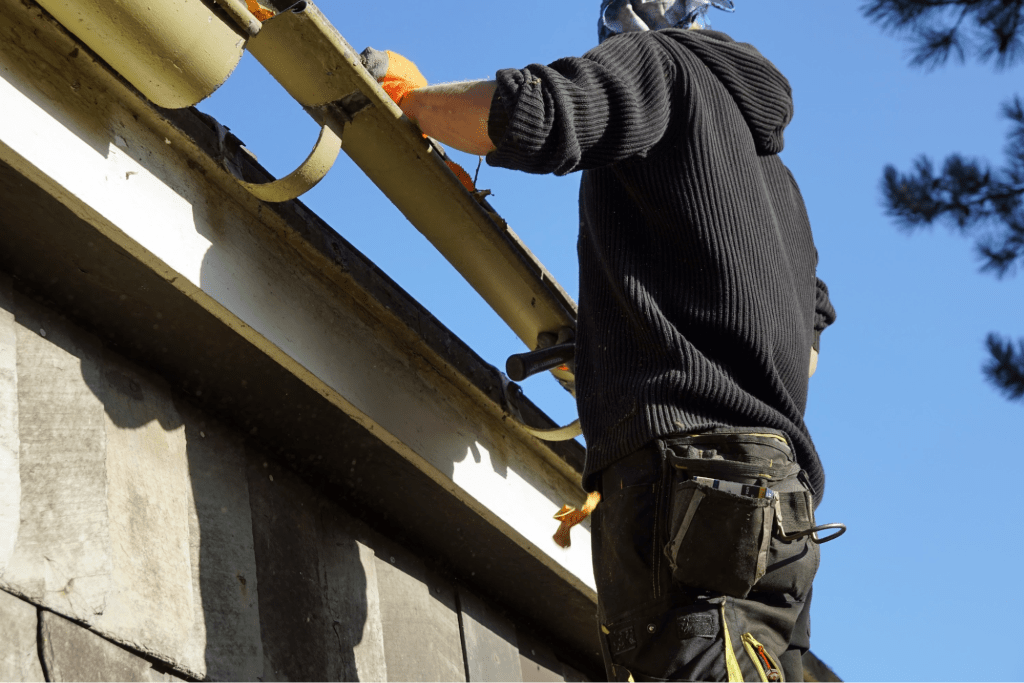
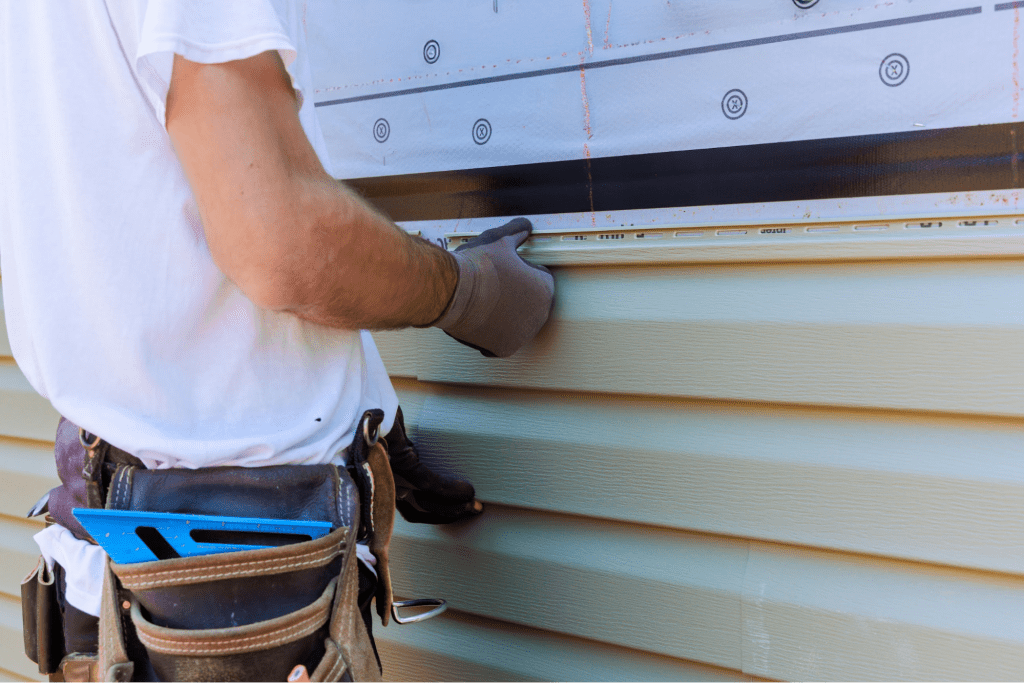
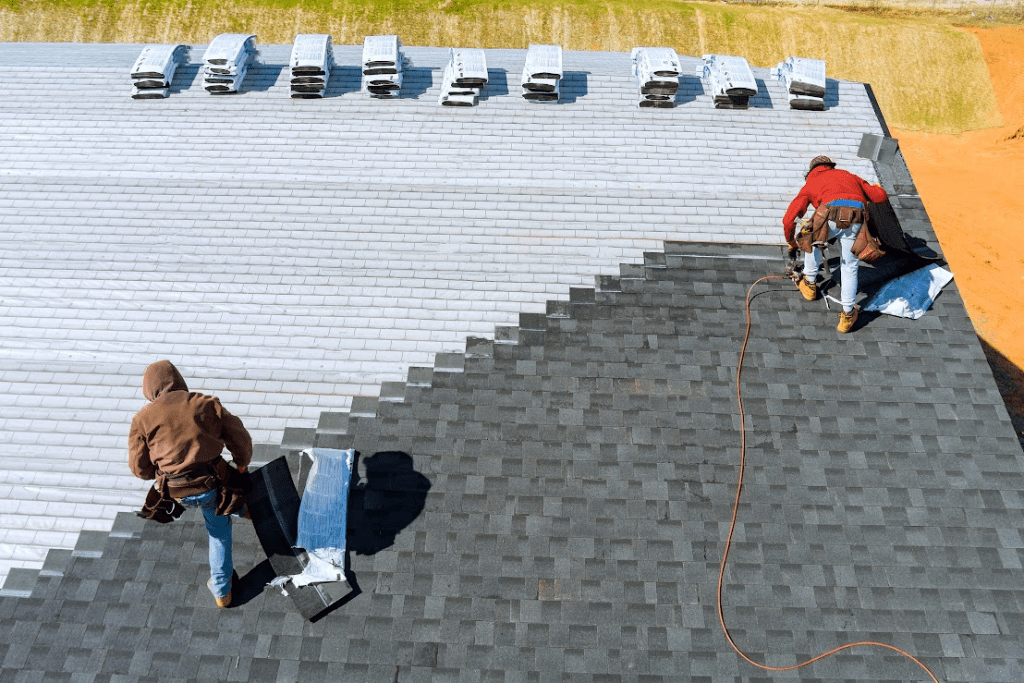
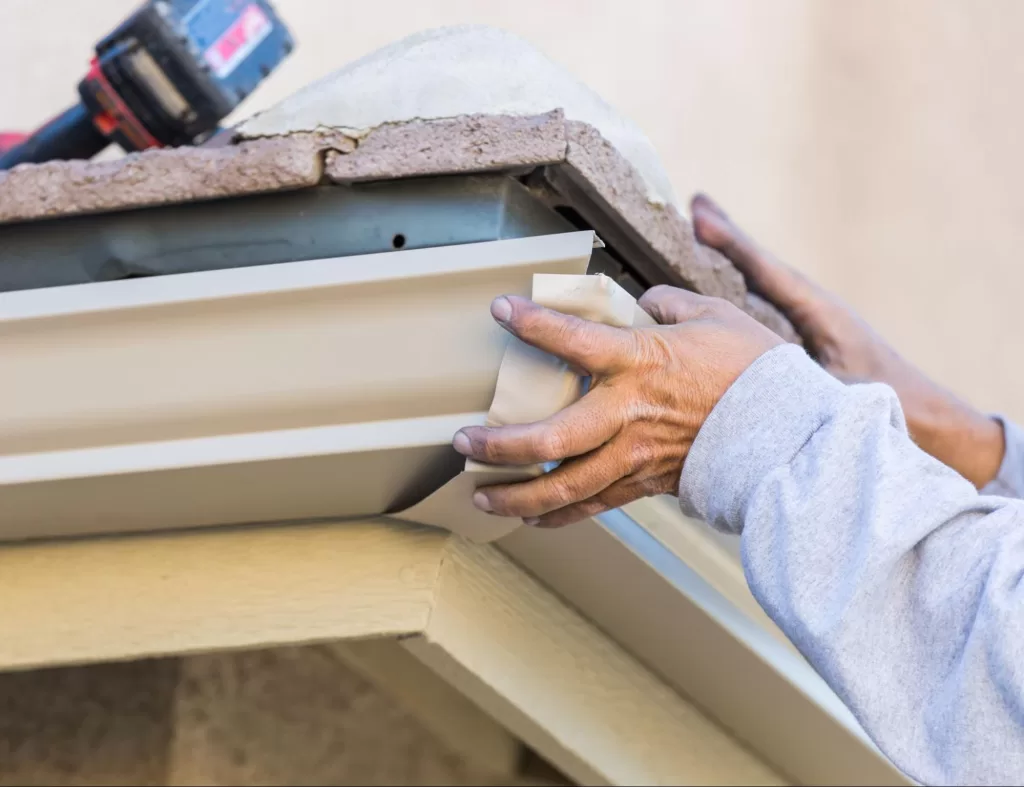
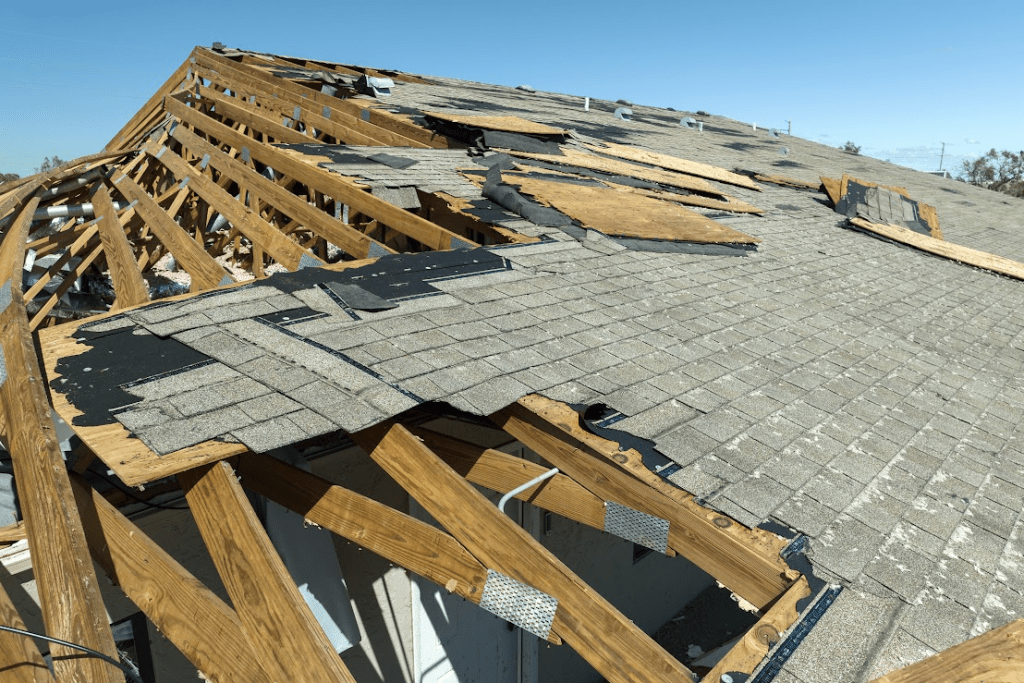
When a storm hits, the aftermath can be overwhelming—damaged roofs, fallen trees, broken windows, and water intrusion can bring life to a standstill. One of the most common questions homeowners ask is: How long does storm damage restoration take? The answer isn’t always straightforward, as it depends on the severity and type of damage, the materials involved, and how quickly restoration services can be deployed. However, understanding the general timeline and what influences it can help you prepare mentally, financially, and logistically.  Initial Assessment Phase in Storm Damage Restoration The storm damage restoration process begins with a comprehensive inspection and damage assessment. This inspection typically takes place within 24 to 72 hours after the storm has passed, depending on accessibility and the availability of the restoration team. During this phase, professionals examine the entire structure—roof, siding, windows, gutters, attic, and interior spaces—for visible and hidden damage. Detailed documentation, including photographs and written reports, is gathered for insurance claims. If the property is deemed unsafe, emergency steps such as boarding up windows or tarping the roof may be taken immediately. The quicker this step is done, the sooner roof repairs can begin. What Emergency Repairs Look Like in Storm Damage Restoration  Once the initial assessment is complete, the next stage in storm damage restoration is implementing emergency repairs to prevent further damage. These repairs may include tarping holes in the roof, boarding broken windows, or extracting standing water inside the home. These measures are usually completed within 24 to 48 hours of the initial inspection, especially if water damage is involved. Temporary fixes are crucial because they stabilize the structure and minimize additional costs from mold, rot, or secondary impacts. While they don’t constitute final repairs, they serve as an essential bridge between damage and complete restoration. Filing Insurance Claims Delays Storm Damage Restoration The insurance claims process is a significant variable in how long storm damage restoration takes. While some policies allow for quick online claims and automated adjustments, others require in-person inspections and back-and-forth communication that can slow progress. Typically, it takes one to two weeks for insurance adjusters to complete their evaluations and approve funding. Restoration companies often need this approval before proceeding with significant work, especially when it involves roof replacement or structural repairs.  Structural Repairs in Storm Damage Restoration Once insurance is approved and materials are on-site, structural repairs begin. These are the most time-consuming aspects of storm damage restoration and can take anywhere from several days to a few weeks, depending on the extent of the damage. If your roof needs to be replaced, the framing or decking needs to be redone, or the primary support beams require reinforcement, the project timeline may be extended accordingly. During this phase, professional crews ensure that everything is returned to code, often improving upon the original construction. While the wait can be frustrating, rushing structural repairs is never advisable—it’s better to get it right than to rush. Roofing Work in the Storm Damage Restoration Timeline For many homes, the roof often bears the brunt of storm damage, making it a top priority in any restoration plan. Roofing work, including removing old shingles, replacing underlayment, decking repairs, and installing new shingles, can take anywhere from two to seven days. Weather plays a significant role in this part of the storm damage restoration process—rain or wind can cause unavoidable delays. Additionally, the availability of roofing materials may impact how quickly the job can begin. Experienced roofing contractors are skilled in efficiently organizing these phases to minimize time and resource waste. Window and Siding Repairs in Storm Damage Restoration After a severe storm, windows and siding are often among the most visibly impacted home parts. Addressing these exterior elements promptly is essential to restore structural integrity, prevent further weather intrusion, and maintain the home’s overall appearance. Window Replacements Replacing storm-damaged windows typically takes one to three days, depending on the number of windows that need replacement and whether custom sizing is required. Proper window installation also helps prevent future leaks and restores the home’s energy efficiency. Siding Restoration Siding repairs may take several days to over a week, depending on the size of the home, the extent of the damage, and the availability of matching materials. Replacing damaged siding not only protects the structure but also restores curb appeal. Parallel Project Scheduling These exterior elements are often repaired in conjunction with interior work, helping to reduce the overall storm damage restoration timeline. Coordinating crews across tasks can expedite completion and minimize disruptions to your daily routine. Interior Storm Damage Restoration and Water Mitigation Interior storm damage is often linked to water intrusion, which brings with it a range of additional concerns, including mold, damaged drywall, warped floors, and compromised insulation. Water mitigation usually begins immediately after emergency services are complete, with drying equipment and dehumidifiers set up to remove moisture from walls and flooring. This process alone can take three to five days. Once the area is dry and inspected, repairs such as drywall replacement, painting, flooring installation, and insulation can begin. Depending on the extent of the damage, interior restoration can add one to three weeks to the timeline. Mold Remediation Adds Time to Storm Damage Restoration If water damage goes untreated for even 24 to 48 hours, mold growth can begin—particularly in hidden areas like insulation, framing, or crawlspaces. Mold remediation is a specialized part of storm damage restoration and must be handled carefully to protect occupant health. This process includes containment, removal, air filtration, and clearance testing, and it can take anywhere from three days to several weeks, depending on severity. While it adds time to the overall restoration, skipping or rushing mold removal can lead to significant problems. Hiring a licensed team ensures proper protocols and safety are maintained. Permits and Inspections Affect Storm Damage Restoration Schedules Depending on your municipality, permits may be required before work begins or during specific phases of restoration. Waiting on permit approval can delay your project by days or even

A contractor installing a rain gutter.
Uncategorized

Why Timely Rain Gutter Repair Can Save You Thousands in Water Damage

Gutters are often an overlooked part of a home’s exterior, yet they serve as one of the most critical lines of defense against water intrusion and damage. When functioning correctly, gutters redirect rainwater away from your home’s foundation, roof, siding, and landscaping. But when they’re clogged, broken, or pulling away from the structure, the risks multiply quickly—and so do the costs. Timely rain gutter repair is not just about maintenance; it’s a strategic investment that can save you thousands in preventable water damage repairs. Rain Gutter Repair Protects Your Home’s Foundation When gutters become damaged or clogged, water no longer flows away from your home as it should. Instead, it pools around the base of your house and slowly seeps into the ground near your foundation. This ongoing saturation increases hydrostatic pressure, which can lead to cracks, shifting, or total foundation failure. A timely rain gutter repair diverts this water safely away, preserving your home’s structural integrity and avoiding massive repair bills. Even minor gutter issues, if ignored, can result in thousands of dollars in foundation damage. Addressing problems early helps maintain stable moisture levels and preserves the long-term value of your property. Preventing Roof Leaks Starts With Rain Gutter Repair Gutters that can’t drain water effectively often cause it to back up under shingles and roofing materials. Once that water enters your roof deck or attic, it causes rot, mold, and active leaks. These roofing problems often go unnoticed until significant interior damage has occurred. Regular rain gutter repair prevents this by ensuring water flows away from your roof rather than sitting stagnant along the edge. This proactive maintenance helps you avoid emergency roofing services and insurance claims. Clean, functioning gutters are your roof’s first line of defense against water intrusion. Rain Gutter Repair Stops Siding and Fascia Damage Water running over the sides of your gutters will travel directly down your siding and soak the fascia boards beneath your roof. Over time, this constant exposure leads to warping, discoloration, and eventual rot. These components are not just aesthetic; they help protect your home’s shell from the elements. Timely rain gutter repair ensures that water doesn’t ever reach these sensitive areas in the first place. Protecting Driveways and Walkways With Rain Gutter Repair Uncontrolled rainwater can quietly damage your paved surfaces over time, resulting in severe and costly issues. Consistent rain gutter repair helps prevent damage by keeping water away from vulnerable areas, such as driveways and walkways. Downspout Placement Proper downspout placement ensures that water is directed away from the pavement rather than pooling or running across it. Misplaced downspouts often contribute to cracks and erosion along the edges of concrete and asphalt. By guiding runoff to safe drainage zones, this minor adjustment has a significant impact on the pavement’s longevity. Drainage Control Effective drainage control prevents water from flowing toward high-traffic areas, such as walkways and driveways. It reduces the risk of freeze-thaw damage in colder climates and limits erosion in warmer ones. Keeping runoff in check preserves the integrity of your paved surfaces year-round. Surface Protection By diverting water properly, rain gutter systems reduce the chance of structural damage to sidewalks and driveways. This protection helps surfaces remain level, safe, and visually appealing over time. Routine gutter repairs play a direct role in extending the life of outdoor paved areas. Rain Gutter Repair Preserves Your Home’s Interior When moisture penetrates through the exterior of your home, it can soak into insulation, walls, and ceilings, which causes staining, material degradation, and even dangerous mold growth behind walls and above ceilings. These interior damages are expensive to diagnose and fix, often requiring demolition and replacement. Proactive rain gutter repair prevents water from breaching your home and reaching these sensitive areas. Effective gutters also relieve hydrostatic pressure that can push moisture through foundation walls. Keeping water outside ensures a healthier indoor environment and protects your investment. The Cost of Delay Far Exceeds Rain Gutter Repair Costs Waiting to fix a gutter issue may feel harmless, but the damage multiplies over time. What starts as a loose bracket or minor crack can spiral into water-soaked wood, foundation settlement, or a collapsed gutter system. Basic rain gutter repair costs are lower than those for structural or water damage repairs. Investing in early fixes is not just smart—it’s financially necessary. Routine maintenance catches problems before they escalate into emergencies. Avoiding delays ensures your home remains protected through every season. Rain Gutter Repair Extends the Life of Your Gutters Neglected gutters degrade faster, rust sooner, and sag more easily. Minor issues, such as clogged joints or separated seams, can eventually lead to total system failure. Keeping up with timely rain gutter repair helps preserve the entire system and extends its serviceable lifespan. This timely repair reduces the frequency and cost of full gutter replacements, saving homeowners thousands of dollars. Regular cleaning and sealing also prevent ice dams and corrosion. Well-maintained gutters function more effectively and last significantly longer than those that are ignored. Catching Problems Early With Rain Gutter Repair Many serious gutter problems begin with signs that are easy to overlook, such as subtle leaks, uneven flow, or slow drainage. With regular inspections and fast action, these early-stage issues are cheap and easy to resolve. If left unchecked, they evolve into major failures requiring complete sections to be replaced. Staying alert and proactive with rain gutter repair keeps minor issues from growing into costly ones. Homeowners should schedule seasonal checks, especially after storms or when heavy debris has accumulated, to ensure their property is well-maintained. Early intervention helps avoid emergencies and ensures your system stays efficient. Signs You Need Immediate Rain Gutter Repair When your gutter system begins to show signs of trouble, it’s essential to act promptly. Minor issues can escalate into severe water damage if left unaddressed. These issues can be easily spotted if you know what to look for. Sagging or Pulling Away Gutters Gutters that sag or detach from the fascia board indicate that they’re overloaded or

A contractor installing vinyl siding.
Services

What to Expect During a Vinyl Siding Installation Project

Vinyl siding installation is a popular home improvement project that can dramatically enhance the look and protection of your home’s exterior. Whether replacing aging siding or upgrading for the first time, knowing what to expect can help you prepare and reduce stress. This guide will walk you through every step of the vinyl siding installation process, from planning to clean up, so you know exactly what to anticipate. Why Vinyl Siding Installation is a Smart Choice Choosing vinyl siding for your home is practical due to its many benefits. Vinyl siding offers excellent durability against weather, insects, and fading. It is also affordable compared to other siding materials and requires minimal maintenance over the years. The versatility in colors and styles means it can complement nearly any home design, boosting curb appeal without frequent upkeep. This combination of protection, style, and cost-efficiency explains why vinyl siding installation remains one of the most popular exterior upgrades. Planning Your Vinyl Siding Installation Project Proper planning is key to a successful siding installation. During planning, you will meet with your contractor to review your home’s measurements and discuss design preferences. In this stage, you’ll choose the style, color, and special features like insulation or decorative trim. Setting a clear budget and timeline is crucial to avoid surprises later. Thorough preparation ensures the project aligns with your expectations and home needs. Scheduling a Professional Consultation Meeting with a siding expert helps determine what materials and styles best suit your home. The professional will take precise measurements and evaluate the current state of your exterior to identify any potential challenges. This consultation is also the time to ask questions and get expert recommendations tailored to your climate and home architecture. Selecting the Style and Material Vinyl siding comes in many styles, including traditional lap, vertical panels, shakes, and scallops. Choosing the right style can enhance your home’s aesthetic appeal and complement its features. Your contractor can explain the pros and cons of each style and help you find a material grade that balances durability and budget. Preparing Your Home for Vinyl Siding Installation Before work begins, your home and yard must be ready to accommodate the installation team. This preparation involves clearing away outdoor furniture, decorations, and plants that could obstruct access to your walls. It also means protecting your interior by removing breakables near exterior walls, as noise and vibrations are common. Proper preparation helps the installers work efficiently and minimizes disruptions. Clearing the Exterior Work Area Unobstructed access around your home helps the crew move ladders, scaffolding, and materials easily. It also reduces the risk of accidental landscaping or personal belongings. Clearing the area ensures the team can maintain a safe work environment and complete the job efficiently. Protecting the Interior of Your Home Although the installation happens outside, vibrations and noise may travel indoors. Moving fragile items and valuables away from exterior walls can prevent accidental damage during the work. Additionally, closing windows near the work zone helps minimize dust and debris from entering your home. Removing Old Vinyl Siding and Inspecting the Structure If your home has existing siding, it must be removed for the new vinyl. This process lets contractors check the underlying wall structure for damage or decay. Any issues must be repaired before proceeding to ensure a strong, lasting installation. Removing old siding can take several days, depending on the house size and siding condition. The Process of Removing Existing Siding Installers carefully strip old siding without damaging the structural sheathing beneath. This step often involves prying panels loose and hauling away debris, which can be labor-intensive. Protecting the home’s framing during removal is critical to prevent costly repairs later. Checking for and Repairing Damage Once the old siding is removed, the contractor inspects the sheathing, insulation, and framing for signs of moisture damage, rot, or pests. Identifying and addressing these issues early prevents structural problems and extends the life of your new siding. Siding repairs may include replacing damaged wood, sealing gaps, or improving insulation. Preparing the Wall Surface for Vinyl Siding Installation Once the old siding is removed and repairs are completed, the wall surface must be adequately prepared. This preparation includes installing a weather-resistant barrier such as house wrap to protect against moisture intrusion. The sheathing itself may need to be replaced or reinforced to provide a flat, stable base. Proper preparation is critical for the siding to perform well and maintain its appearance over time. Inspecting and Replacing Sheathing Sheathing provides the foundation for siding panels, so it must be in excellent condition. If the existing sheathing is warped, cracked, or rotted, it will be removed and replaced to create a solid surface. This step ensures your new siding will lay flat and fasten securely. Applying a Weather-Resistant Barrier The house wrap or similar weather-resistant barrier protects against water infiltration, allowing trapped moisture to escape. This barrier helps prevent mold and wood rot inside the wall cavity. The barrier is carefully overlapped and sealed around windows and doors to maintain a continuous protective layer. Vinyl Siding Trim and Essential Accessories Before the siding panels are installed, trim pieces like corner posts, starter strips, and window casings are installed. These elements frame the siding and give it a finished, professional look. Properly installed trim also helps direct water away from vulnerable points, protecting the home from leaks. Adding Corner Posts and Starter Strips Corner posts cover the panel edges and create clean, polished corners that enhance your home’s appearance. Starter strips are installed along the bottom edge of walls to provide a secure base for the first row of siding panels. Both elements are crucial for structural integrity and visual appeal. Window and Door Trim Installation Trim around windows and door seals to fill gaps between siding and openings, preventing drafts and water intrusion. This trim adds architectural detail, helping your home look cohesive and well-maintained. Installers carefully measure and cut trim pieces to fit snugly for a seamless finish. How the Vinyl Siding

An aerial view of two workers replacing shingles on a roof.
Services

What Factors Influence the Cost of Roof Replacement in 2025

Replacing a roof is one of the most significant investments a homeowner can make, and in 2025, the variables affecting that cost are more nuanced than ever. Between labor shortages, material price fluctuations, climate-related building codes, and advanced roofing technologies, understanding the factors that contribute to the cost of roof replacement is crucial for making an informed decision. This blog breaks down the key factors influencing pricing in today’s roofing market, helping homeowners budget wisely and choose materials and services that suit both their property and their finances. Material Choice Heavily Impacts the Cost of Roof Replacement When it comes to roofing, material selection is the most immediate and influential factor in determining the total cost of roof replacement. Each material carries its own price point, expected lifespan, and installation complexity. Asphalt Shingles Remain the Budget-Friendly Standard Asphalt shingles remain the most popular roofing option due to their affordability and widespread availability. In 2025, standard three-tab shingles generally cost less than architectural shingles but have a shorter lifespan. Homeowners opting for asphalt can expect material costs to be relatively low, with total project costs varying depending on the roof size and layout. Premium Materials Increase Both Durability and Expense Those seeking long-term performance and upscale curb appeal often opt for premium options, such as metal, clay tile, or slate. These materials come at a higher initial cost but typically offer a much longer service life. Metal roofing, for instance, is energy-efficient and recyclable, while natural slate roofs can last more than 100 years. With these benefits come higher installation fees and specialized labor requirements, both of which contribute to the increased total cost of roof replacement. Emerging Green Technologies Affect Pricing Solar shingles and cool roofs—both designed for sustainability—are gaining traction in 2025. While they can reduce long-term energy costs, their upfront expenses are higher than those of traditional materials. Factoring in installation time, compatibility with existing systems, and future savings is essential when weighing these advanced options. Labor and Installation Complexity Raise the Cost of Roof Replacement The human element is another major factor in the cost of roof replacement. In 2025, labor markets across the construction sector are tight, with skilled roofers in high demand. Moreover, the complexity of your roof—both in its design and structural needs—can directly impact how much you’ll pay. Regional Labor Rates Continue to Vary Depending on where you live, the cost of labor can swing significantly. Urban areas with a higher cost of living typically have higher roofing labor rates, whereas rural regions often offer more competitive pricing. Weather patterns also play a role. In climates prone to seasonal roofing slowdowns, demand can surge during the dry season, further raising rates. Roof Pitch and Access Challenges Add Time and Cost A steeply pitched roof or one with multiple angles and dormers will increase labor time and safety precautions. If scaffolding, harness systems, or additional crew members are required, expect the price to rise. Likewise, if your home is difficult to access due to landscaping or location, these logistics may inflate the cost of roof replacement. Tear-Off vs. Layover Projects Whether your roofers need to remove the existing roof or can apply new materials over it makes a big difference in both labor intensity and disposal fees. Tear-off jobs take more time and generate more waste but are generally preferred for longevity. Layovers might reduce initial labor costs but can conceal underlying damage, leading to bigger expenses down the road. Roof Size and Shape Play a Role in the Cost of Roof Replacement It may seem obvious, but the sheer size and geometry of your roof are key factors in determining the total cost of roof replacement. The larger and more complex the roof, the more material and labor will be required. Larger Roofs Demand More of Everything More surface area means more shingles, underlayment, fasteners, flashing, and labor hours. Even relatively inexpensive materials can become costly when required in bulk. Additionally, large roofs often necessitate more safety equipment, higher insurance premiums for the crew, and extended project timelines. Multi-Level and Irregular Shapes Increase Labor Intensity Homes with multiple stories, intricate rooflines, or architectural details like skylights and chimneys require additional planning and cutting. These details not only increase labor time but also the potential for installation errors or the need for custom flashing and sealants. Permits and Building Codes Contribute to the Cost of Roof Replacement In 2025, increased attention to building safety and energy efficiency has led to more stringent permitting requirements and building codes. These regulations have a direct impact on the cost of roof replacement, particularly in regions affected by severe weather or prone to wildfires. Permit Fees Are Location-Dependent Most municipalities require permits for roof replacement projects. The cost of these permits varies widely and may be calculated based on factors such as project size, property value, or flat-rate fees. In some cities, streamlined digital permitting has made the process faster, but it remains no less costly. Code Upgrades Add to Material and Labor Costs Some regions now require Class A fire-rated roofing, hurricane straps, or impact-resistant shingles. While these improvements offer better protection, they also incur additional material and labor costs. If your existing roof is outdated or non-compliant, the new installation will need to be brought up to the current code, further increasing the cost of roof replacement. Underlying Structural Damage Elevates the Cost of Roof Replacement What lies beneath your roof can sometimes be the biggest unknown in any replacement project. If roofers uncover structural damage during the process, it will inevitably add to the cost of roof replacement. Rot, Mold, and Pests Drive Up Costs Hidden issues such as rotten decking, mold infiltration, or termite damage can significantly increase the scope of work. These problems require immediate attention to prevent future deterioration, which means the roofing crew may need to replace sheathing, rafters, or insulation before installing the new roof. Older Homes Pose Additional Risks Older homes may have structural quirks or outdated framing

A close-up view of rain gutter installation.
Siding Installation and Replacement

Rain Gutter Replacement and Home Value: What You Should Know

Most homeowners don’t think about their gutters until something goes wrong. But when it comes to protecting your home and boosting its value, they deserve more attention. Gutters may not be the flashiest feature, but they handle the mess that could ruin your foundation, siding, or landscaping. A worn-out system tells buyers something’s been neglected, even if the rest of the house looks fine. Swapping old gutters for a solid new setup isn’t just maintenance—it’s a smart way to protect what you’ve built. Why Rain Gutter Replacement Matters More Than You Think When people assess home value, they usually think big. But the small things often reveal how a home has been maintained. Gutters aren’t flashy but carry real weight regarding protection and appearance. Worn-out gutters may not seem urgent until they’ve caused thousands in repairs. Rain gutter replacement is often needed before it’s too late. Gutters Protect More Than Your Roof Gutters do more than carry water off the roof. They direct rain away from your home’s foundation. Without them, water can pool and seep into the basement, leading to mold, cracks, and costly structural problems. Replacing old gutters keeps that water moving safely away. Curb Appeal Isn’t Just About Paint and Plants Old gutters can negatively affect your home’s first impression. Rust, dents, and peeling paint make the place look neglected. Fresh gutters clean up the roofline and bring order to the edges. Buyers notice that kind of visual upkeep quickly. Rain gutter replacement improves both looks and function. How Rain Gutter Replacement Affects Home Value A cracked foundation or water-stained walls will hurt your asking price, often resulting from failed gutters. Fixing visible gutter damage can protect your home’s resale value and tell buyers that basic maintenance hasn’t been ignored. Rain gutter replacement is one upgrade that protects your investment and keeps your home competitive. Inspectors Look for Signs of Water Issues Home inspectors notice signs of neglect during a sale. Sagging or leaky gutters are immediate red flags. They often signal deeper water damage below the surface. Buyers worry that a bad gutter means mold or foundation issues. A new system removes that concern entirely. Small Investments Can Bring Bigger Returns The gutter replacement doesn’t carry the cost of a kitchen redo. But it can still bump your home’s value at closing. It’s a low-cost move that signals close attention to detail. Buyers know it’s one less repair they’ll need to make. That can make your listing more attractive than others. When You Should Consider Rain Gutter Replacement Gutters rarely fail all at once. Instead, they wear down slowly until real problems show up. Knowing when to replace them helps you avoid surprise repairs. Timing is everything, and so is staying ahead of weather damage. These signs will tell you when it’s time to act: Visual Wear and Functional Problems If your gutters have cracks or rust, they need replacing. Sagging or pulling away from the roof is another sign. Water spilling over the sides during rain shows they’re not draining right. You might also see peeling paint or stains near the base of your home. These are all signs that the system isn’t doing its job. After Major Storms or Harsh Seasons Storms can break or shift your gutters without you noticing. Hail dents them, heavy snow weighs them down, and winds loosen brackets. After a rough season, check the system for damage. Even minor issues can lead to long-term water problems, and acting fast can prevent that. Choosing the Right Rain Gutter Replacement for Your Home Choosing the wrong type of gutter can cost you in repairs and appearance. Material, shape, and color all play a role in function and design. You want something that works for your weather and fits your home style. Not all gutters are created equal; some choices last longer than others. Picking the right system means fewer issues later on. Materials Make a Big Difference Aluminum gutters are popular because they don’t rust and are lightweight. They’re easy to install and cost-friendly for most homes. Copper is more expensive but adds class and lasts for decades. Vinyl is the budget choice, but it cracks in extreme temperatures. Steel is strong but needs a coating to prevent rust over time. Style and Function Should Match Your Home K-style gutters hold more water and best suit newer homes. Half-rounds are often used for older or historic properties. Seamless gutters give a smooth look and reduce leak points. You’ll also find different sizes depending on rainfall levels. Picking a style that suits your roof keeps water flowing where it should. Professional Installation vs. DIY Rain Gutter Replacement Trying a gutter project yourself is tempting, especially with all the online how-to videos available. But the details matter more than you might think. A slight slope mistake can cause overflow and damage. While DIY can save upfront costs, it often leads to expensive fixes later. Knowing when to call a pro can save you money in the long run: When It’s Worth Hiring a Pro Professional roofers know the exact slope gutters need to drain correctly. They also check your fascia and soffits for hidden issues. Installers bring the right tools to cut and fit gutters correctly. You’ll get a clean, finished look that holds up over time. That kind of work adds confidence for future buyers, too. Risks of Doing it Yourself Ladder work is dangerous, especially on two-story homes. Misjudging a slope or unevenly hanging it causes water problems. DIY gutters often leak where sections join together. Mistakes might not show until your next big storm. At that point, the siding or foundation damage can cost far more than a professional job. Maintenance After Rain Gutter Replacement Even brand-new gutters can fail if they’re neglected. Just because they’re new doesn’t mean they don’t need attention. Regular upkeep helps them last longer and work better. Clean gutters protect everything beneath them—your siding, landscaping, and even the basement. A little effort goes a

A roof repair specialist in a blue hard hat smiles at the camera after finishing his task.
Roof Repairs & Replacement

What Does a Roof Repair Specialist Do?

A roof repair specialist handles inspections, fixes leaks, restores damaged materials, and reinforces structural integrity to protect homes. Addressing minor issues early prevents costly replacements and extends a roof’s lifespan. Proper sealing, flashing repairs, and shingle replacements help maintain durability against weather damage. On the other hand, emergency services ensure quick solutions for storm-related problems, while preventive maintenance recommendations keep future repairs manageable. Skilled specialists also improve energy efficiency by enhancing insulation and ventilation. Understanding a Roof Repair Specialist’s Responsibilities A roof repair specialist ensures roofs remain durable by performing inspections, repairs, and maintenance. Immediately addressing damages prevents expensive replacements and protects the structure from further deterioration. Fixing leaks, reinforcing weak areas, and restoring worn-out materials help maintain a roof’s strength. Emergency repairs and preventive solutions keep homes safe from unexpected roofing failures. Conducts Roof Inspections A roof repair specialist inspects roofs to help identify leaks, damaged shingles, and weak structural components. Spotting minor issues before they escalate prevents costly repairs and extends the roof’s lifespan. They also evaluate flashing, underlayment, and ventilation to ensure the system functions properly. Providing detailed assessments allows homeowners to plan necessary maintenance and improvements. Repairs Leaks and Water Damage Fixing leaks prevents moisture from seeping into the structure and causing mold growth. A roof repair specialist replaces damaged underlayment and seals cracks to protect the interior from water damage. Addressing weak spots in roofing materials strengthens the overall structure. Ensuring proper drainage reduces the risk of future leaks and deterioration. Replaces and Restores Roofing Materials A roof repair specialist repairs or replaces missing shingles to maintain the roof’s appearance and functionality. They also restore flashing and sealants to prevent moisture from penetrating through vents and chimneys. Securing loose tiles or panels prevents wind and storm damage. Using durable materials enhances the roof’s resistance to weather conditions. Reinforces Roof Structure A roof repair service can strengthen rafters and trusses, preventing sagging and structural instability. The roof can withstand heavy loads and harsh weather by repairing weak areas. Reinforcing the framework increases the roof’s lifespan and reduces the need for frequent repairs. Keeping the structure secure protects the home from long-term damage. Provides Emergency and Preventive Maintenance A roof repair company can handle emergency repairs, minimizing damage after storms, leaks, or sudden roofing failures. A repairman applies quick fixes to prevent further deterioration until full repairs can be completed. Recommending maintenance schedules helps homeowners avoid significant roofing issues. Regular inspections and minor repairs extend the roof’s lifespan and reduce long-term costs. Improving Roof Ventilation and Insulation Poor ventilation traps heat and moisture, leading to premature roof damage. A professional roof repair man installs or repairs vents to improve airflow and regulate temperature. Proper insulation prevents energy loss and reduces strain on HVAC systems. Enhancing ventilation and insulation extends the roof’s durability. AddressesMold and Algae Growth Moss, algae, and mold weaken roofing materials and trap moisture. These issues can occur at any time, so regularly removing growth with the help of a roof repairman prevents deterioration and extends the roof’s lifespan. Specialists apply treatments to inhibit future buildup and protect shingles. Preventing biological growth reduces the risk of interior mold issues and roof rot. Enhances Roof Drainage Systems Poor drainage leads to water pooling and premature material deterioration. Cleaning gutters, downspouts, and scuppers is essential to ensure proper water flow. Installing additional drainage solutions prevents water from accumulating on flat or low-slope roofs. Maintaining efficient drainage reduces the risk of leaks and structural damage. Signs You Need a Roof Repair Specialist Right Away  Roofing problems require expert assessment to prevent costly damage and safety risks. Improper repairs or temporary fixes often lead to more severe structural issues over time. A roof repair specialist ensures that complex roofing problems are handled with the proper techniques and materials. Severe Storm Damage High winds, hail, and heavy rainfall cause extensive roof damage, weakening the structure. Missing shingles, torn flashing, and punctured roofing materials expose the home to leaks and interior damage. Identifying hidden storm-related issues prevents long-term deterioration. Reinforcing damaged areas and replacing compromised materials restore the roof’s protective function. Structural Weakness and Sagging A sagging roof indicates underlying issues with support beams, rafters, or water-damaged decking. Excessive weight from snow, debris, or previous repairs contributes to instability. Strengthening the structure prevents further sagging and reduces the risk of collapse. Replacing weakened components ensures the roof can withstand long-term environmental stress. Persistent and Hard-To-Find Leaks Leaks often originate from compromised flashing, deteriorated underlayment, or hidden cracks. If left unaddressed, water infiltration damages insulation, ceilings, and walls. Identifying the exact source requires specialized tools and expertise. Sealing leaks properly and replacing affected materials prevents future water-related damage. Poor Ventilation and Heat Retention Inadequate ventilation traps heat and moisture, accelerating roof deterioration. Excessive heat causes shingles to warp and underlayment to weaken. Proper airflow regulation prevents mold growth and extends the roof’s lifespan. Installing or repairing ventilation systems improves energy efficiency and overall roof performance. Advanced Flashing and Chimney Repairs Flashing around vents, chimneys, and skylights deteriorates, leading to leaks. Improperly sealed joints allow moisture to penetrate the roof’s interior. Repairing or replacing flashing prevents water intrusion and structural damage. Securing these vulnerable points ensures long-term weather resistance and durability. How a Roof Repair Specialist Fixes Shingle and Tile Repair Shingles and tiles protect the roof from weather damage, but cracks, missing pieces, and loose materials compromise their effectiveness. A roof repair specialist ensures these problems are fixed correctly to prevent leaks and structural damage. They use precise methods to replace damaged materials, secure loose sections, and reinforce weak areas to restore the roof’s durability. Proper installation and maintenance can keep the roof functional and visually appealing for years. Inspects the Damaged Area A roof repair specialist examines the roof and helps locate missing, cracked, or misaligned shingles and tiles. The specialist also identifies the extent of the damage and ensures the right materials and repair techniques are used. Assessing the surrounding structure prevents hidden issues from being overlooked. A detailed

Scroll to Top