Author name: admin

A worker installs an aluminum gutter and downspout on a home’s fascia for proper rainwater drainage.
Gutter Repair

How to Prevent Future Issues After a Gutter Repair

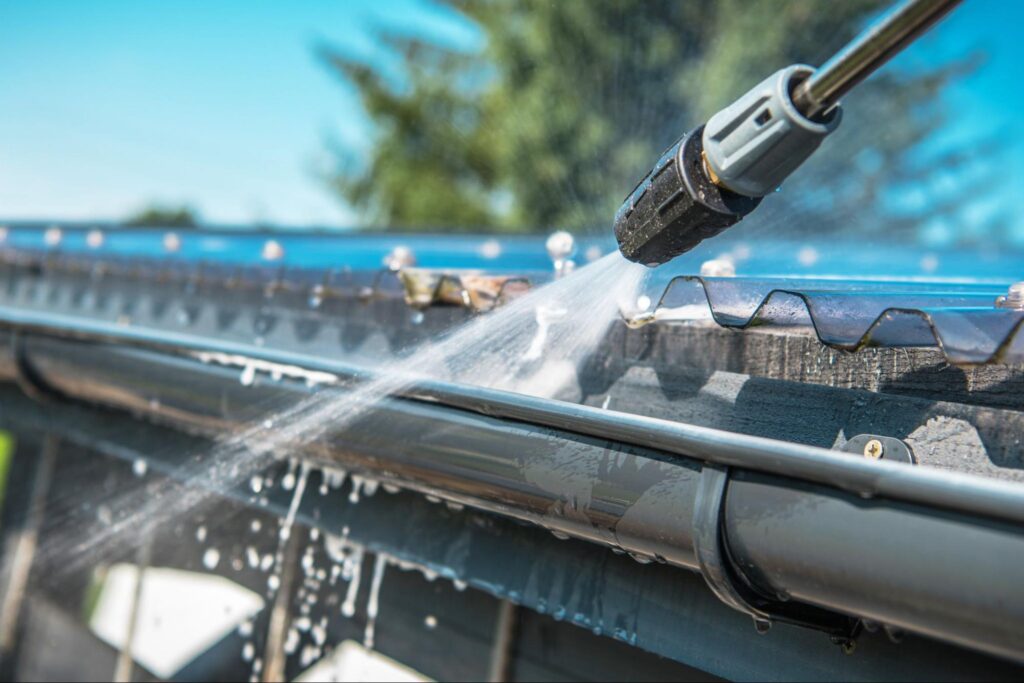
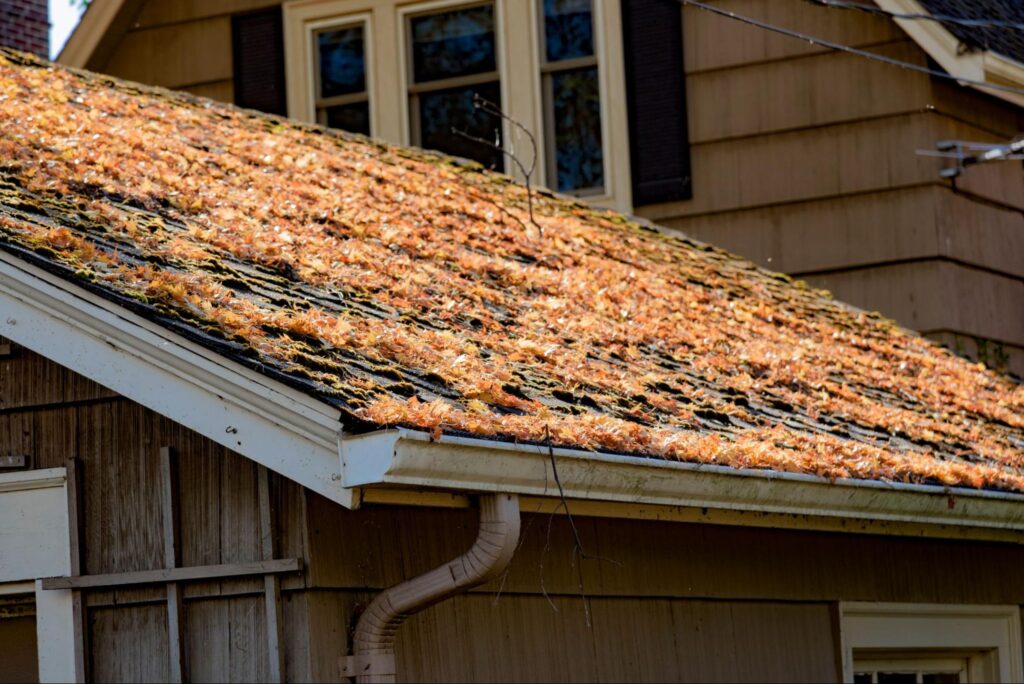
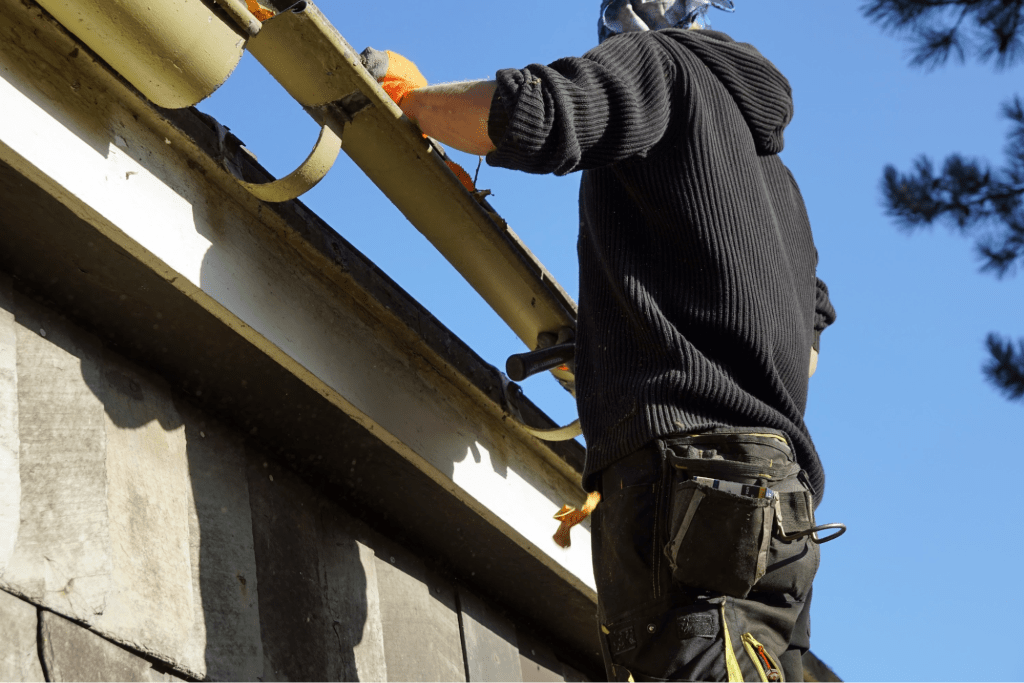
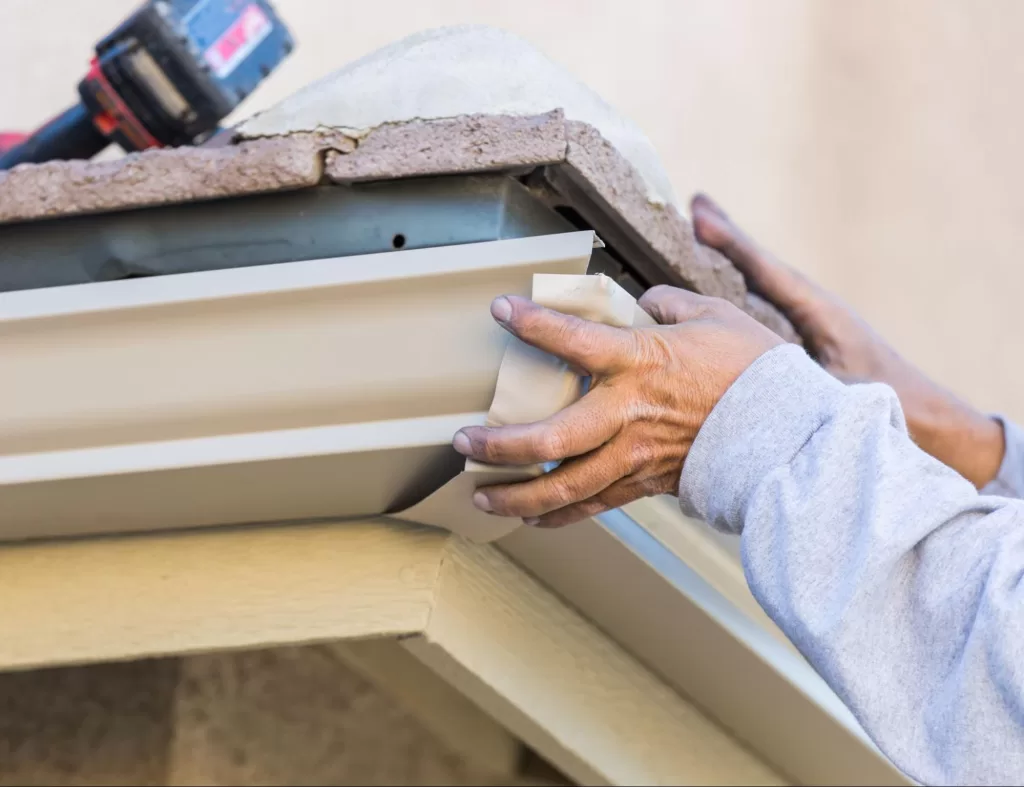
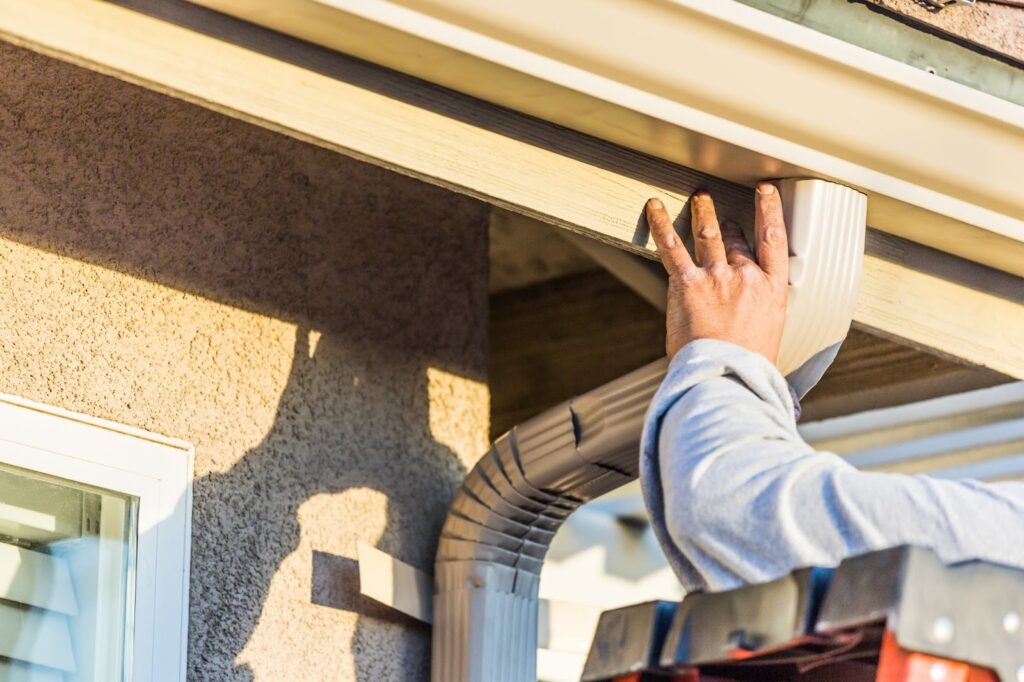
Homeowners often treat gutter repairs as a one-time fix, but the real challenge begins afterward. Once the repair is done, gutters still face the same rain, debris, and weather that damaged them before. Without follow-up care, even the best repair can fail sooner than expected. Keeping your gutter system strong requires attention, consistent upkeep, and smart decisions that prevent recurring damage. Caring for repaired gutters protects residential and commercial properties from hidden structural issues. Understanding the Purpose of Gutter Repair Gutter repair restores proper water flow and prevents damage to roofs, walls, and foundations. When gutters are neglected, even small cracks or clogs can lead to major structural problems. Repairs, fixing leaks, realigning slopes, and securing joints are necessary to handle heavy rain. Knowing what your repair addressed helps you plan how to keep gutters working well afterward. Why Gutters Fail in the First Place Gutters fail mainly because of clogging, poor maintenance, or worn-out parts. When debris builds up, water pools and corrodes metal seams, weakening the system. Loose fasteners or poor installation can make gutters sag or detach from fascia boards. Weather changes also cause expansion and contraction that break sealants over time. Regular cleaning and early inspections reduce the chances of another failure after a repair. What Proper Gutter Repair Really Fixes A proper repair goes beyond sealing visible cracks. It restores the gutter’s structure, improves slope, and strengthens attachment points. Professionals also reseal joints to stop slow leaks that can damage siding or foundations. When a gutter is repaired correctly, water drains smoothly, reducing stress on the roofline. Hiring qualified gutter contractors ensures the fix lasts longer and prevents repeat service calls. Regular Maintenance After Gutter Repair Post-repair maintenance protects the money and effort invested in the repair. Gutters collect leaves, dirt, and roof debris daily, which can undo the work if not addressed. Regular inspections keep minor issues from becoming expensive problems. A planned maintenance schedule keeps gutters clean, sturdy, and dependable throughout the seasons. Set a Seasonal Cleaning Routine A consistent cleaning routine is key to long-lasting gutter performance. After repair, clean gutters every few months, especially during fall and spring. Removing debris prevents clogs and water overflow that can reopen sealed joints. Use gloves, a small scoop, and a garden hose to flush out remaining dirt. If your home or business has tall gutters, call a professional to clean them safely and thoroughly. Inspect Gutters After Every Heavy Rain Storms can test a repaired gutter’s strength. After each rainfall, walk around your property to spot leaks or water pooling near the foundation. Check for drips under joints, uneven flow from downspouts, or sagging sections. Early attention prevents water from seeping into fascia boards or walls. Keep a checklist and note any changes after each storm to track performance over time. Maintain a Simple Gutter Maintenance Schedule Creating a written maintenance plan keeps property care organized. Assign specific months for cleaning, inspection, and minor touch-ups. Set reminders or link gutter tasks with other seasonal maintenance. A schedule helps homeowners and building managers avoid forgotten repairs. Consistent care extends the life of every gutter system, especially after professional service. Preventing Structural Stress on Repaired Gutters Gutters face constant physical strain from water weight, wind, and roof debris. Even a small buildup adds pressure that weakens joints and mounting brackets. Controlling that stress keeps gutters attached and leak-free for years. Reinforcement and inspection are the most effective ways to preserve the repair’s strength. Watch for Sagging and Loose Fasteners When gutters sag, water collects and causes premature wear. Loose brackets should be tightened immediately to prevent sections from detaching. Replace corroded screws or nails with rust-resistant materials to hold the system firmly. During inspections, look for bending or pulling away from fascia boards. Fixing minor alignment problems early helps avoid gutter collapse or water damage. Manage Roof and Downspout Flow Downspouts direct water safely away from your building’s foundation. Water can erode soil and damage structures if they’re too short or poorly angled. Install extensions or splash blocks to guide runoff several feet from the property. Keep roof valleys clear to prevent overflow onto repaired gutters. Balanced water flow keeps stress even across the system, improving durability. Protecting Gutters from Environmental Damage Natural elements can shorten the life of even a well-repaired gutter system. Tree branches, snow, and heat can all affect its performance. Preventing damage from these sources maintains the gutter’s appearance and strength. Addressing environmental factors saves time, money, and frustration in the long run. Trim Overhanging Trees Regularly Branches that hang over roofs drop leaves, twigs, and sap into gutters. Over time, this buildup blocks water flow and traps moisture. Shade from overgrown trees can also encourage mold and rust to form. Trimming trees every few months keeps gutters clear and dry. It’s safer to hire professionals if branches extend near power lines or rooftops. Guard Against Ice and Snow Damage In cold climates, freezing water inside gutters expands and cracks seams. Icicles and ice dams also pull gutters away from their mounts. Installing heating cables prevents freezing and reduces extra weight. After a snowstorm, use a plastic shovel to clear the buildup gently. Avoid using metal tools that could scratch or damage the repaired surface. Prevent UV and Heat-Related Wear Sun exposure weakens plastic and painted metal gutters. Over time, UV rays cause fading, brittleness, and leaks at joints. Applying a UV-resistant coating adds an extra layer of protection. For homes in hot climates, light-colored gutters better reflect sunlight. Regularly checking paint or coating quality helps maintain both function and appearance. Long-Term Gutter Protection Solutions Preventing future issues means investing in long-lasting materials and smart upgrades. Once your repair holds steady, you can enhance the system for easier maintenance. These minor improvements save both time and money in the future. With modern options available, homeowners can make their gutter systems nearly self-sustaining. Install Gutter Guards or Screens Gutter guards reduce clogging by keeping out leaves and debris. Mesh screens, foam inserts,

Close-up view of a man hammering the wooden siding into place
Siding Installation and Replacement

What You Should Know About the Cost to Replace Siding

Every homeowner eventually faces the reality that their siding won’t last forever. Cracks, fading, and warping often signal it’s time for replacement, not just repairs. New siding does more than refresh curb appeal; it protects your property, enhances insulation, and raises resale value. Understanding the cost of replacing siding helps property owners make informed, confident decisions that benefit their homes for years. Understanding the Real Cost to Replace Siding The cost of replacing siding depends on several interconnected factors that shape the total project expense. Homeowners typically pay anywhere from $6,000 to $25,000 based on material type, home size, and labor requirements. Regional labor rates and architectural complexity can shift pricing considerably. By understanding these elements, you can predict your project’s real cost rather than relying on national averages that don’t match your situation. Material Type and Its Impact on Pricing Material choice drives the largest share of the siding replacement cost. Vinyl is usually the most affordable, offering durability and minimal upkeep. Fiber cement and engineered wood provide longer lifespans and stronger protection against weather, but they cost more to install. Wood siding gives a timeless look yet requires frequent sealing or staining. Metal siding, such as steel or aluminum, provides a modern, sleek finish that performs well in extreme climates. Each option influences total spending differently, depending on installation needs and longevity expectations. Home Size and Exterior Design Complexity A home’s size and layout directly affect how much siding it needs and how long installation takes. Larger homes naturally use more materials and require longer labor hours. Complex architectural designs, featuring peaks, corners, and trims, add difficulty that raises labor costs. Simpler exteriors with flat surfaces and fewer obstacles usually cost less to replace. Homeowners should consider both surface area and design details when budgeting. This ensures they account for hidden expenses that may arise once installation begins. Labor Costs and Contractor Skill Level Labor rates are a significant part of siding expenses and vary by region. Experienced siding contractors charge more, but they bring precision, speed, and warranty-backed results. Less skilled labor might appear cheaper, but it often leads to misaligned panels or moisture gaps. Fixing those mistakes later can be far more expensive than paying for skilled work upfront. Selecting a contractor with verifiable experience protects your investment and your home’s structure. Professional expertise transforms a costly project into a long-term solution instead of a short-lived repair. Additional Costs That Influence Siding Replacement Replacing siding often uncovers additional expenses that go beyond the surface materials. These include old siding removal, wall repairs, insulation improvements, and finishing details. Homeowners who budget only for installation often face surprises once work begins. Accounting for these extras from the start leads to a smoother, more predictable project experience. Removing and Disposing of Old Siding Old siding must come off before new panels can be installed correctly. Removal costs depend on material type, home size, and disposal requirements. Homes with asbestos or older cement boards need specialized handling, which raises costs. Contractors usually charge between $1,000 and $3,000 for removal and cleanup, but these costs may vary based on location and project complexity. Proper removal also allows installers to inspect the underlying walls for hidden damage. This step ensures the new siding attaches securely and performs as expected for years. Repairing Damage Underneath the Old Siding Once panels are stripped away, hidden problems can appear beneath the siding. Rot, insect damage, or moisture infiltration often require repair before installing new siding. Depending on severity, these repairs can cost several hundred to several thousand dollars. Ignoring them risks ongoing structural issues compromising the home’s safety. Fixing underlying damage strengthens the base and helps new siding last longer. It’s an essential part of preserving your home’s look and performance. Adding or Upgrading Wall Insulation Installing new siding creates the perfect opportunity to enhance insulation. Upgraded insulation helps regulate temperature, reduce noise, and lower energy bills. Options include foam board, house wrap, or insulated siding panels. Although it adds to upfront costs, these improvements pay off through reduced heating and cooling expenses. Well-insulated walls also protect against moisture buildup and mold growth. In the long term, the added efficiency can save homeowners more than they initially spent. Finishing Touches and Design Enhancements Trim, soffits, and fascia boards complete a home’s polished appearance. Upgrading these elements adds cost but increases curb appeal and protection. Painting, caulking, and installing decorative details bring visual consistency across the exterior. Neglecting them can leave exposed edges that allow water intrusion. Investing in quality finishes ensures your siding looks refined and functions correctly. The added visual appeal also boosts property value immediately after installation. Average Cost to Replace Siding by Material Type Each siding material has its own pricing, advantages, and maintenance needs. Costs vary by product, location, labor rates, and home design. Choosing the right material means weighing initial cost against long-term performance. Homeowners can use these typical ranges as a starting point for planning realistic budgets. Pricing estimates are based on current industry averages and may vary depending on region, market conditions, and supplier rates. All costs are subject to change over time. Vinyl Siding Cost Range and Benefits Vinyl siding usually costs between $4 and $9 per square foot installed. It remains the top choice for homeowners due to its affordability, low maintenance, and variety of styles. Vinyl resists moisture, pests, and fading better than wood. Cleaning requires only soap and water, keeping maintenance simple. While cheaper varieties can crack in extreme weather, mid-grade vinyl offers excellent durability. For most homeowners, vinyl provides the best balance between budget and long-term value. Fiber Cement Siding Price and Performance Fiber cement siding costs between $7 and $13 per square foot installed. It’s made from a mix of cement, sand, and cellulose fibers, offering superior strength. The material resists rot, insects, and fire better than most other siding types. Although heavier and more labor-intensive to install, its lifespan often exceeds 30 years. Fiber cement also holds paint exceptionally well,

A roofer secures the roof shingles with a hammer and nail during repair work
Roof Repair

The Step-By-Step Process of Professional Roof Shingle Repair

A home’s protection begins with the roof, yet shingles often go unnoticed until they show damage. Cracked or missing shingles can quickly compromise insulation and allow moisture to seep in. These minor problems soon escalate into expensive structural repairs that affect comfort and property value. Professional roof shingle repair provides an exact, structured method that restores strength, improves durability, and keeps every home safe for years. Understanding Roof Shingle Damage Roof shingles are constantly exposed to wind, rain, and sunlight, gradually weakening their protective surface. Understanding the sources of damage helps homeowners detect issues before they spread. Regular inspections and prompt repairs prevent long-term decay and costly roof replacements. Professional roofers use this understanding to plan the right repair strategy for each situation. Common Causes of Roof Shingle Damage Roof shingles deteriorate from environmental stress, poor installation, and age. Continuous exposure to sunlight causes the asphalt layer to dry out and crack. Wind can lift edges and create entry points for water. Rain and humidity lead to algae growth, softening and staining shingles over time. Similarly, improper ventilation traps heat in the attic, accelerating wear from the inside out. Knowing these causes helps property owners anticipate damage and schedule timely repairs. Signs You Need Roof Shingle Repair Roof damage often starts small, but visible warning signs appear quickly. Curling or buckling shingles indicates trapped moisture beneath the surface. Missing or loose shingles expose the underlayment, leading to leaks and wood rot. Granules in gutters suggest that the protective surface is wearing away. Discoloration or sagging sections signal potential water damage in the roof deck. Identifying these signs early gives homeowners a head start before more extensive damage develops. How Shingle Type Affects Wear Each roofing material responds differently to weather exposure. Asphalt shingles are affordable but lose flexibility after years of sun exposure. Wood shakes look natural, but absorb moisture if not properly sealed. Metal shingles resist wind yet loosen at joints when fasteners corrode. Slate or tile shingles last longer but may crack from heavy debris impact. Understanding these variations helps roofers recommend materials suited to the local climate and budget. Preparing for Roof Shingle Repair Preparation determines the quality and safety of every roof repair. Professionals plan each step carefully to avoid mistakes that might weaken the structure. Checking tools, materials, and weather conditions ensures a smooth process. Proper preparation helps roofers complete the repair efficiently and without unnecessary disruption. Safety First Safety is always the top concern in roof repair work. Roofers wear non-slip boots, gloves, and helmets to prevent injuries. Harnesses and ropes keep workers secure when handling steep or wet surfaces. They inspect ladders and ensure they rest on stable ground before climbing. Additionally, repairs are scheduled during dry, mild weather to avoid risks from wind or rain. Having a second person on site provides assistance and an extra layer of safety. Gathering Tools and Materials A well-equipped roofer works faster and avoids interruptions. Essential tools include pry bars, roofing hammers, utility knives, and sealant applicators. Replacement shingles must match the existing ones in color and size for a consistent finish. Roofing cement and waterproof sealant create strong, weatherproof bonds. Professionals also keep underlayment patches on hand to address minor deck issues during repairs. This readiness minimizes downtime and ensures lasting results. Checking Weather and Roof Conditions The weather directly affects the quality of roof shingle repairs. Rain, humidity, or extreme temperatures interfere with adhesives and materials. Professionals constantly review forecasts and choose conditions that support proper bonding. They also inspect roof slopes, flashing, and ventilation systems before work begins. This early assessment prevents wasted effort and ensures the repair protects against future weather challenges. Step-By-Step Roof Shingle Repair Process Professional roof shingle repair follows a systematic, detailed process that restores strength and appearance. Each phase builds on the previous one to create a durable, watertight finish. Roofers rely on tested methods and precision to ensure no detail is overlooked. The final result is a smooth, cohesive surface that withstands future weather conditions. Step 1: Inspecting the Roof Surface The process begins with a complete roof inspection to identify all problem areas. Roofers check for curled, cracked, or missing shingles that indicate deeper wear. They also examine flashing, ridge caps, and joints where leaks often form. Moisture meters help detect hidden dampness beneath the surface. Additionally, professionals look for soft or spongy decking that may require reinforcement. This thorough evaluation forms the basis of an accurate and efficient repair plan. Step 2: Removing Damaged Shingles Damaged shingles must be removed without harming the surrounding ones. Roofers gently lift the overlapping tabs to expose the nails securing each shingle. Using a pry bar, they carefully pull the nails and slide out the damaged piece. They clean away leftover sealant or debris to ensure a flat working surface. This careful removal prevents cracks or tearing in nearby shingles. It also ensures that the new shingles fit snugly and look uniform. Step 3: Repairing the Roof Deck Beneath the shingles, the deck provides the structural foundation for the roof. Professionals check it for signs of rot, mold, or warping caused by leaks. If any sections feel soft or unstable, replace or reinforce them with new wood panels. This step guarantees a solid base for the new shingles. Additionally, roofers inspect the underlayment for tears and apply patches if necessary. A strong deck ensures the entire roof remains stable and long-lasting. Step 4: Installing New Shingles The new shingles are installed in precise alignment with the existing rows. Roofers secure them with roofing nails driven just below the tar line for a tight hold. They apply roofing cement beneath each tab to create a water-resistant seal. Every shingle must sit flush without gaps or raised edges that could catch wind. Matching color and texture helps blend the repaired area seamlessly. Careful placement gives the roof a uniform look and restores its complete protection. Step 5: Sealing and Final Touches The final phase focuses on securing and sealing the

A miniature home with the words “repair costs” spelled in Scrabble tiles
Roof Repair

How Roof Repair Estimates Are Calculated

A damaged roof can disrupt any homeowner’s comfort and peace of mind. Whether it’s a small leak after a heavy rain or visible damage from years of wear, one question always comes first: how much will it cost to fix? Roof repair estimates give that answer, but not all quotes are equal. Understanding how these estimates are calculated helps homeowners plan wisely, avoid overpaying, and make informed repair decisions that protect their property long-term. Understanding Roof Repair Estimates Roof repair estimates outline the expected costs and materials for your roofing project. They give you a financial overview before any work begins, helping you anticipate labor, materials, and time requirements. Reliable roofing contractors use these documents to show professionalism and transparency. They also help you compare service providers and avoid misleading or incomplete proposals. The Purpose of a Roof Repair Estimate A roof repair estimate serves as a roadmap for the entire project. It helps you understand what you are paying for, how long repairs may take, and the scope of work involved. Contractors use estimates to set clear expectations and maintain transparency. When done correctly, estimates build trust, reduce confusion, and prevent surprise charges later. They also protect both parties by documenting agreed-upon costs and repair details. Key Components in Roof Estimates A roof repair estimate includes materials, labor costs, timeline, and warranty coverage. It may also detail permit fees, waste disposal, and cleanup services. Transparent estimates let you see exactly where each dollar goes. A vague or incomplete estimate is a warning sign that the contractor may cut corners. Detailed estimates, on the other hand, indicate a contractor who values accuracy and professionalism. Factors That Influence Roof Repair Estimates Several variables affect how roof repair estimates are calculated. The roof size, materials to be used, local pricing, and extent of damage all contribute to the total. No two homes have identical repair needs, so estimates can vary widely. Understanding these cost drivers helps homeowners spot fair quotes and choose the right contractor. Roof Size and Slope Large roofs need more materials and time, which raises the total cost. A steep slope also makes repairs more complex and labor-intensive. Contractors must use additional safety gear and take extra precautions, which increases labor rates. Small or flat roofs are generally less costly because they are easier to access and repair. The roof’s size and angle directly influence time, risk, and resource allocation in your estimate. Roofing Material Type Different roofing materials have unique costs and installation requirements. Asphalt shingles remain the most affordable, while metal, tile, or slate roofs cost more due to their durability and weight. Specialty materials often need custom tools or experienced installers. Disposal costs also vary depending on the material type. Choosing high-quality roofing materials can raise upfront costs but extend your roof’s lifespan and reduce long-term repairs. Extent of Roof Damage The severity of damage heavily impacts the final estimate. Minor repairs like patching leaks cost less than replacing sections of decking or insulation. Contractors inspect the whole roof to identify surface and hidden damage before finalizing the price. Costs may increase if issues such as rot or mold appear during inspection. Proper damage assessment prevents underestimation and ensures the repair holds up over time. Labor Costs and Regional Rates Labor prices differ depending on where you live and who you hire. Urban areas often have higher labor costs than rural ones due to increased living expenses. Licensed, experienced roofers charge more but provide better craftsmanship and safety compliance. Some contractors include debris removal or warranty coverage in their rates. Comparing estimates in your area helps you find a fair price without sacrificing quality. Permits and Local Regulations Certain repairs require city or county permits, which add to your total cost. Permit fees vary by region and are based on project size or scope. Following local regulations protects your investment and keeps your property compliant with building codes. Skipping permits can result in penalties or insurance complications later. A trustworthy contractor will handle the permitting process as part of their service. The Role of Roof Inspections in Estimates Roof inspections form the foundation of every accurate estimate. Contractors rely on them to uncover visible and hidden issues before quoting prices. Inspections can reveal underlying damage that affects the repair scope and materials. Skipping this step often leads to inaccurate pricing and unfinished work later on. On-Site Roof Evaluation A roof inspection starts with a thorough visual assessment. Contractors check for missing shingles, weak spots, water stains, and flashing damage. Many take photos or videos to document their findings. They also discuss potential repair options with homeowners on-site to maintain clarity. This step ensures your estimate reflects real roof conditions rather than assumptions. Moisture and Structural Testing Some damage hides beneath the surface, especially water intrusion or wood rot. Contractors use infrared scanners or moisture meters to detect unseen issues. Identifying structural weaknesses early prevents extensive repairs later. These advanced tests can adjust your estimate slightly but save money in the long term. Knowing your roof’s actual condition guarantees accuracy and safety during repairs. Use of Estimation Software Modern roofing companies often rely on digital tools to produce estimates. Satellite mapping, drone imagery, and measuring software provide exact roof dimensions. This technology eliminates manual errors and speeds up the quoting process. Homeowners receive visual breakdowns showing cost by section or material. Digital estimates create transparency and boost confidence in the contractor’s accuracy. How to Compare Roof Repair Estimates Comparing roof repair estimates helps you determine value, not just cost. Some estimates look cheaper but omit vital details like cleanup or warranties; the most reliable estimate balances fair pricing, quality materials, and detailed breakdowns. A careful comparison helps you invest wisely and avoid hidden expenses. Review the Contract Details Every estimate should clearly explain materials, warranty duration, and payment terms. Read carefully to identify additional fees or unclear language. Look for information on debris removal, insurance coverage, and worker safety protocols. Contractors who provide detailed documentation show

A professional roofer lays reflective insulation before installing new roof tiles
Roofing Replacement

What is Involved in Roofing Replacements? A Complete Guide

When a roof begins to age, the signs appear fast, such as leaks during heavy rain, missing shingles, or fading patches that dull the home’s charm. A reliable roof protects your home from harsh weather, controls indoor temperature, and supports property value. Over time, even the strongest materials deteriorate under constant exposure to sunlight and moisture. Understanding what’s involved in roofing replacements gives homeowners the insight needed to confidently restore strength, safety, and style to their homes. Understanding Roofing Replacements Roofing replacements involve removing old roofing materials and installing a new system to protect the home. This process covers everything from decking inspection to the final layer of shingles or tiles. Homeowners often confuse replacements with repairs, but replacements rebuild the entire structure for lasting durability. Knowing how the process works helps you appreciate the value of a properly installed roof and what professionals do to achieve it. What a Roofing Replacement Involves A complete replacement starts by removing old materials, including shingles, nails, and underlayment. Roofing contractors inspect the wooden decking beneath to identify rot, cracks, or moisture damage that could weaken support. Once repairs are complete, they add waterproof underlayment and metal flashing around valleys, vents, and chimneys for leak prevention. New shingles or tiles are installed in uniform rows for a balanced appearance and solid protection. The process ends with ridge caps and ventilation components to maintain airflow and regulate attic temperature. Every layer serves a purpose, creating a roof that performs efficiently and lasts for decades. When Roofing Replacements Become Necessary Old roofs show clear signs when they can no longer perform properly. Curling or missing shingles, sagging areas, or water stains on ceilings indicate severe wear. Constant patchwork repairs become costly and ineffective over time. Once leaks spread or decking weakens, complete replacement becomes the practical solution. A professional inspection identifies the extent of deterioration and confirms the best course of action. Replacing the roof promptly prevents structural damage and restores peace of mind. Roof Replacement vs. Roof Repair Roof repairs handle surface problems like isolated leaks or damaged shingles, while replacements address root causes hidden beneath layers. Repairs temporarily extend the roof’s life but may not fix underlying decking or ventilation issues. In contrast, replacements start fresh, eliminating weak spots and old materials. This investment saves money in the long term by reducing maintenance costs and energy waste. Roof replacements upgrade insulation and curb appeal, adding comfort and resale value. The decision depends on roof age, damage severity, and future maintenance goals. Preparing for Roofing Replacements Preparation is key to a smooth, efficient roofing replacement. Proper planning minimizes disruptions and keeps the project on schedule. Homeowners who prepare their property and understand each step experience fewer issues during installation. A well-organized approach allows contractors to work safely, quickly, and with optimal results. Roof Inspection and Assessment Professional roofers begin with an in-depth inspection to assess the roof’s condition. They check for water damage, structural sagging, and ventilation balance that affect long-term performance. Specialized tools help detect trapped moisture that may not be visible from the surface. After inspection, roofers explain their findings clearly, outlining repair or replacement options. This transparency helps homeowners make informed choices without unnecessary expenses. A detailed assessment builds the foundation for accurate estimates and quality results. Choosing the Right Roofing Materials Selecting materials depends on climate, budget, and design preferences. Asphalt shingles remain popular for affordability and simple installation. Metal roofing offers extended durability, energy savings, and weather resistance, which makes it ideal for humid or coastal areas. Clay and slate tiles deliver elegance and longevity but require reinforced structures due to weight. Composite or synthetic options combine classic appearance with modern strength. A trusted roofing professional helps match materials with home style and performance needs, balancing cost with value. Estimating Costs and Getting Quotes Roofing replacement prices vary based on size, slope, and materials used. Contractors usually measure the roof area and calculate costs per square foot, including labor and disposal fees. Homeowners should request detailed quotes outlining materials, warranty terms, and cleanup services. Comparing multiple estimates ensures fair pricing and prevents hidden charges. Transparent contractors explain cost factors like ventilation upgrades or decking repairs. A fair estimate reflects experience, quality materials, and trustworthy service. Preparing the Home for Replacement Before work begins, clear the driveway, lawn, and patio areas around the home. Cover valuable items in the attic to protect against falling debris and dust. Contractors may place tarps over shrubs and move outdoor furniture to safe zones. Communication is vital; confirm the project schedule, noise expectations, and safety measures. Pets and children should remain indoors during active work hours. These simple steps make installation faster, cleaner, and safer for everyone involved. The Roofing Replacement Process The roofing replacement process follows structured steps that combine craftsmanship, safety, and precision. Every phase impacts quality and longevity, from removing old materials to final inspection. Professional roofing contractors use specialized tools and proven techniques to ensure consistent results. Understanding this sequence helps homeowners track progress confidently. Removing the Old Roofing The crew removes all existing shingles, underlayment, and flashing materials. This step exposes the decking, allowing a clear view of potential structural issues. Contractors carefully dispose of waste materials using designated bins to maintain cleanliness. Tarps or protective barriers prevent debris from damaging landscaping or gutters. Although noisy, this process is essential for a fresh and stable foundation. Clean surfaces allow for the secure installation of new roofing layers. Inspecting and Repairing the Roof Deck Once cleared, the decking undergoes close examination for signs of rot, soft spots, or cracks. Damaged boards are replaced to maintain structural strength. Contractors tighten any loose nails and apply sealants where needed for reinforcement. This inspection ensures the roof can hold new materials without shifting or bending. Decking repairs directly influence how long the roof will last under weather pressure. Precision during this stage determines long-term durability and safety. Installing the New Roofing System Roofers install an underlayment to create a waterproof barrier between

Workers install cement board siding on the exterior facade of a new wooden frame house during construction
Siding Installation

How to Prepare Your Home for Siding Installation

Homeowners often look forward to siding installation because it refreshes a home’s appearance and protects against the elements. The process, however, can be disruptive without proper preparation. Planning makes installation smoother and protects your property from unnecessary damage. Preparing your home before the siding crew arrives ensures better results, safer working conditions, and long-term durability. Understanding the Siding Installation Process Siding installation involves removing old materials, inspecting the surface, and attaching new panels securely. Each stage affects the quality and longevity of the finished exterior. Homeowners who understand these steps can prepare their homes more effectively and avoid unnecessary setbacks. This understanding allows for better communication with contractors and smoother project execution. Why Preparation Matters Before Siding Installation Preparation streamlines the installation process and minimizes costly surprises. When the work area is clear, crews can focus on precision rather than moving obstacles. Clean surfaces help siding panels attach tightly and resist moisture penetration. Homeowners who prepare thoroughly also help prevent last-minute repairs that disrupt schedules. This proactive approach keeps the project efficient and supports siding durability. Well-prepared homes ultimately experience smoother installation and stronger long-term protection. Common Challenges During Siding Installation Challenges often arise from unaddressed moisture damage, uneven walls, or cluttered work zones. Weather interruptions, poor access, and inadequate repairs can also delay completion. By preparing ahead, homeowners help crews work safely and efficiently without needing repeated adjustments. Inspecting walls and clearing outdoor spaces considerably reduces these risks. Preparation also prevents costly mistakes that could affect siding performance or appearance. Taking time to prepare creates a more predictable installation experience and a lasting result. How Proper Prep Shapes Siding Installation Results Preparing your home before siding installation determines how smoothly the project unfolds. A strong start reduces costly setbacks and allows installers to work precisely and confidently. Taking time to inspect, clean, and organize your exterior ensures siding adheres correctly and looks professional once complete. Proper preparation sets the foundation for siding that enhances curb appeal and stands the test of time. Inspect and Repair the Home Exterior Inspecting the exterior before siding installation protects your investment and ensures a stable foundation. Even small cracks or damp patches can grow into structural problems once covered. Identifying these issues now prevents future moisture or pest infiltration. Addressing them also gives the new siding a clean, even surface to adhere to. Check for Water, Rot, and Pest Damage Water stains, peeling paint, or soft wood often signal hidden decay. Probe suspect areas near eaves, windows, or baseboards to test their strength. Look for tiny holes or sawdust piles that suggest insect activity. If large areas show signs of damage, contact a licensed inspector for a detailed assessment. These evaluations uncover deeper issues that homeowners might miss. Repairing these problems before installation helps the new siding protect the home more effectively for years. Repair Damaged Surfaces Before Installation Once damage is detected, repair it promptly to prevent further deterioration. Replace weakened boards, reinforce framing, and apply sealant to joints that allow water entry. Smooth and level surfaces create a better foundation for siding panels. If left uneven, panels may warp or crack after exposure to temperature shifts. Sealing cracks also improves insulation and reduces air leaks. This careful preparation ensures the siding sits evenly and performs reliably over time. Seal and Treat the Walls for Long-Term Protection Sealing exterior walls prevents water penetration and mold formation. Apply a vapor barrier or house wrap to block moisture from entering the structure—Caulk around windows and door frames for a tight seal. Homeowners with wooden exteriors should use weather-resistant primer or treatment to prevent decay. These protective layers increase siding durability and energy efficiency. They also reduce maintenance costs while keeping your home secure in varying climates. Clear the Work Area for Siding Installation A clean and open workspace is essential for safe and efficient siding installation. Siding contractors need enough room to move tools and panels around the property. Clutter or obstacles can slow down progress and raise the risk of damage. Preparing outdoor areas in advance keeps the project organized and reduces potential hazards. Move Outdoor Furniture, Vehicles, and Décor Move vehicles away from the work zone to give trucks and crews full access. Relocate patio sets, decorations, and storage bins to a garage or shed. Even small items like planters can obstruct ladders or create tripping risks. Label your stored items for easy retrieval once the project ends. This organization saves time and keeps your belongings intact. A clear workspace also allows workers to focus on precision without unnecessary interruptions. Protect Landscaping, Driveways, and Garden Areas Use tarps or light coverings to protect plants, lawns, and garden beds from falling debris. Avoid heavy materials that could crush shrubs or flowers. Cover concrete or paved surfaces to prevent scratches and stains from tools. If you have irrigation systems, flag or mark them before the crew arrives. This precaution prevents accidental damage during installation. Maintaining your landscape’s health throughout the project enhances your home’s curb appeal. Clear Pathways and Access Points Ensure that sidewalks, gates, and driveways remain open for material delivery and crew movement. Remove any clutter, hoses, or loose items from common walkways. If you have pets, set up barriers to keep them away from work zones. These steps help avoid delays and maintain safety during active construction. Organized access points make it easier for installers to maneuver ladders and panels. A smooth setup shortens project time and keeps your property orderly. Prepare the Inside of Your Home While siding installation happens outside, the vibrations and dust often reach indoors. Taking small steps inside your home helps reduce disruption and damage. The process may create noise, so families should plan accordingly. Preparing both exterior and interior spaces keeps the experience comfortable for everyone. Remove Wall Hangings and Fragile Items Remove artwork, photos, and wall-mounted shelves on exterior-facing walls. Vibrations from hammers and drills can shake these items loose. Store fragile decorations and collectibles safely in another room. Use padded boxes for

Close-up of a roofer’s hand securing a metal roofing panel with a power drill
Roof Repair

The Most Common Problems That Require Roof Repair Services

Roofs silently carry the burden of protecting every structure beneath them. They face heat, rain, and storms while keeping interiors safe and dry. Over time, constant exposure leads to damage that threatens safety and comfort. Knowing the most common problems that call for roof repair services helps property owners respond effectively and protect their investment before it worsens. Why Expert Roof Repair Services Are Important Expert roof repair services provide more than quick fixes; they deliver long-term protection and peace of mind. Trained professionals use advanced tools and proven techniques to identify issues that untrained eyes often miss. Their precision ensures repairs are durable, weather-resistant, and compliant with safety standards. Investing in expert roof repair prevents recurring damage and enhances property value and structural reliability for years. Common Issues That Need Roof Repair Services Roofs endure constant exposure to harsh elements, from scorching heat to driving rain. Over time, this exposure leads to wear that no property owner can ignore. Minor imperfections often turn into costly problems when left unchecked. Understanding which roofing issues require expert repair helps prevent larger damage and preserves long-term protection for homes and buildings. Leaks and Water Damage Leaks often begin with small openings but quickly cause extensive interior damage. Water seeping through the roof affects insulation, ceilings, and structural wood. It also encourages mold growth, harming air quality and the property’s value. Regular inspections and professional repair services prevent these leaks from becoming larger structural issues. Damaged or Missing Shingles Damaged or missing shingles are one of the primary causes of roof leaks. Harsh winds, heavy rain, or simple aging weaken shingles, allowing water to penetrate. Cracks, curling edges, or missing granules often signal that replacement is necessary. Roof repair professionals remove broken shingles, seal exposed areas, and install new ones to restore the roof’s barrier. Additionally, periodic roof evaluations help catch shingle issues before they escalate into interior water damage. Flashing Failures Around Roof Penetrations Flashing seals the roof joints around vents, chimneys, and skylights to prevent water from entering. When flashing loosens, rusts, or cracks, hidden entry points for leaks are created. This damage usually appears after extreme weather or poor installation. Roof repair services fix this issue by resealing or replacing defective flashing. Properly maintained flashing safeguards the roof’s most vulnerable areas against continuous moisture exposure. Clogged Gutters and Overflowing Water Clogged gutters disrupt natural water flow and cause overflow that seeps beneath shingles. When debris collects in gutters, it blocks drainage, leading to rot around fascia boards and soffits. Prolonged exposure to backed-up water damages both the roof and foundation. Professional roofers clear out debris and install guards to maintain proper drainage. Consistent cleaning keeps the system efficient and reduces the risk of water damage year-round. Storm and Wind Damage Storms are among the most destructive forces affecting residential and commercial roofs. Heavy winds lift materials, hail bruises surfaces, and flying debris punctures the structure. These conditions weaken the roof’s protective layers, often leading to leaks that appear days later. Professional roof repair services assess and restore roofs quickly after severe weather to prevent deeper deterioration. Torn or Lifted Roofing Sections Strong winds generate uplift pressure that loosens shingles and metal panels. When parts lift or tear away, rain easily seeps into the underlayment. Loose sections often rattle during high winds, signaling potential failure. Roof repair experts secure lifted shingles, replace damaged panels, and reinforce attachment points for better wind resistance. Timely restoration keeps moisture out and prevents interior decay. Hail Impact and Hidden Bruising Hailstones strike with enough force to fracture asphalt or dent metal roofing. Though damage may seem superficial, these bruises compromise protective coatings and allow slow leaks. Roofing contractors identify bruised areas using professional inspection methods, including infrared scanning or tactile testing. They replace damaged shingles or panels before the problem spreads. Documenting hail damage is also crucial for insurance claims and financial coverage. Debris Damage and Punctures Storm debris, like branches, twigs, or sharp materials, can puncture roof surfaces. Even small holes lead to long-term leaks and insulation issues. Professional roofers repair these punctures by sealing or replacing damaged sections and inspecting for hidden moisture. They also recommend trimming nearby trees to minimize impact during future storms. Consistent upkeep strengthens the roof’s resilience against environmental stress. Poor Roofing Installation Improper installation often leads to early roof failure, even if the materials are high-quality. Poor craftsmanship results in leaks, sagging sections, or insulation inefficiency. These errors frequently surface within the first few years after construction. Experienced roofers can correct installation mistakes through targeted repairs or complete reinstallation to restore durability. Misplaced Nails and Overlapping Mistakes Incorrectly placed nails weaken shingles and shorten their lifespan. Nails driven too shallow or deep cause lifting, tearing, or water infiltration. Likewise, misaligned overlapping exposes seams that should remain sealed. Roofing professionals fix these mistakes by removing affected shingles, resecuring them properly, and resealing joints for watertight protection. Quality craftsmanship ensures long-lasting structural integrity. Faulty Underlayment or Barrier Problems The underlayment forms a crucial moisture barrier beneath shingles. It wrinkles, tears, or fails to align when installed poorly, allowing leaks to spread unseen. Roof repair services replace defective underlayment and inspect the deck for damage. This step restores full waterproofing and prevents recurring leaks. Selecting durable materials and certified installers helps avoid these costly errors in future replacements. Poor Ventilation Causing Roof Deterioration A roof with inadequate ventilation traps heat and moisture inside the attic. This environment accelerates material decay and encourages mold growth. Over time, trapped heat also raises indoor temperatures, increasing cooling costs. Roofers resolve ventilation issues by adding ridge vents or exhaust systems for better airflow. Balanced ventilation extends the roof’s lifespan and maintains energy efficiency. Aging Roofs and Natural Wear All roofs gradually wear down from constant exposure to sunlight, wind, and rain. As materials weaken, cracks form, and waterproofing layers lose effectiveness. These aging effects vary depending on climate, maintenance, and material quality. Timely roof repair services help extend aging roofs before complete replacement becomes

Upward view of a home exterior with newly replaced vinyl siding panels
Siding Installation and Replacement

Is Replacing Vinyl Siding Worth the Investment?

Homeowners often reach a tipping point where their siding no longer performs or appeals. Vinyl siding, while built for durability, doesn’t last forever. Over time, it fades, cracks, or warps, reducing protection and curb appeal. When energy costs rise or a property’s value needs to be boosted, many consider replacing vinyl siding as a long-term solution. Why Homeowners Replace Vinyl Siding  Vinyl siding replacement restores a home’s function and appearance. Aging siding can compromise energy efficiency, allow moisture to enter, and decrease the property’s resale value. Homeowners start to notice higher utility bills or visible damage on the exterior. These issues add up quickly, making replacement a more practical move than continuous repairs. Aging Vinyl Siding Wears Down Over Time Older vinyl siding begins to show wear through fading, cracking, and brittleness. These signs often appear after decades of exposure to sun, rain, and seasonal changes. When panels loosen or warp, they no longer effectively seal out air or water. That can lead to drafts or trapped moisture inside the walls. Many homeowners ignore these signs until the damage affects insulation or framing. Replacing worn siding is the only way to restore performance fully. Poor Insulation Can Drive Up Energy Costs Outdated siding often lacks modern insulation or energy-efficient materials. As a result, heating and cooling systems work harder to maintain comfortable indoor temperatures, driving up energy bills, especially in homes with original siding from the 1990s or earlier. Upgraded vinyl siding with built-in insulation helps reduce thermal loss and more effectively stabilize interior temperatures. Homeowners who invest in insulated siding often notice immediate savings. Curb Appeal Matters When Selling a Home Curb appeal strongly influences a home’s value and marketability. Damaged or faded siding can deter potential buyers before they even enter. Replacing vinyl siding creates a fresh look that signals care and attention to detail. In many markets, homes with new siding sell faster and closer to the asking price. It’s a smart improvement for anyone planning to list their home soon. Replacing Vinyl Siding Costs vs. Long-Term Value While the upfront price of siding replacement is noticeable, the long-term benefits often outweigh it. Energy efficiency, lower maintenance costs, and home value gains all contribute to its return on investment. Understanding the total cost breakdown helps homeowners plan wisely and avoid surprises. Upfront Siding Costs Depend on Size and Features National averages indicate that vinyl siding replacement typically ranges from $6,000 to $15,000. Final costs vary based on the size, design complexity, and local labor rates of your home. Materials and added insulation can also raise or lower the price. These figures are general estimates, not fixed prices, and are subject to change over time. Vinyl remains more budget-friendly than alternatives such as wood or fiber cement. Consulting a licensed siding contractor is the best way to get an accurate quote. Insulated Vinyl Siding Saves Money Over Time Insulated siding offers one of the highest returns on investment among exterior upgrades. It reduces heating and cooling expenses while enhancing comfort inside the home. Homes in cold climates, especially, benefit from reduced drafts and improved thermal performance. Over the next 10 to 15 years, energy savings can cover a significant portion of the initial cost. Additionally, many insulated products qualify for tax credits or energy rebates. That makes them a smart upgrade, offering both immediate and long-term benefits. Vinyl Requires Less Maintenance Than Other Materials Vinyl siding requires minimal maintenance compared to painted wood or stucco. Maintaining appearance doesn’t require regular repainting, sealing, or treatment. High-quality siding resists color fading and surface damage. It reduces upkeep costs and time spent on repairs. Many homeowners find the reduced maintenance alone justifies the investment. Choosing quality materials can extend the lifespan of new siding to over 30 years. Signs That It’s Time to Replace Vinyl Siding Knowing when to replace siding helps prevent bigger problems from developing. When siding fails to protect the home adequately, damage to the framing, insulation, or drywall can result. Spotting early signs allows homeowners to take action before costs multiply. Moisture Damage Shows Up as Mold or Warping Moisture behind siding leads to warped panels, mildew, and peeling interior paint. These signs often appear after heavy rains or snow. Once water gets behind the siding, it can spread quickly, damaging insulation and wooden framing. Trapped moisture may also create air quality issues indoors. If you notice moldy smells or warped walls, it could be time to inspect your siding. Prompt replacement can prevent further damage. Frequent Repairs Indicate Underlying Issues If you constantly patch, seal, or replace siding panels, the root problem may be more significant. Aging vinyl becomes brittle and prone to cracking, particularly in extreme weather conditions. Frequent repairs cost money and reduce your home’s visual consistency. Eventually, repairs become less effective and more expensive than starting fresh. Upgrading to modern vinyl solves the issue altogether. An Outdated Look Hurts Property Value Siding that looks dated can drag down your home’s perceived value. Colors and textures from decades past often clash with modern tastes. New vinyl siding offers better customization, textures, and color stability. Updating the exterior brings the home up to current design trends, increasing neighborhood appeal and personal satisfaction. Key Benefits of Replacing Vinyl Siding  Modern siding products outperform their older counterparts in almost every category. Today’s vinyl offers better energy efficiency, durability, and style options. Homeowners get a blend of practical performance and visual improvement for decades. Modern Siding Designs Improve Curb Appeal New vinyl siding includes high-end finishes, wood-look textures, and bold color choices. These updates mimic natural materials while offering better weather resistance. Matching trim and architectural accents can dramatically change a home’s appearance. Homeowners now have more ways to personalize their exterior without overspending. It helps the property stand out in any neighborhood. Improved aesthetics also translates into increased property value. New Siding Raises Appraisal and Resale Value Homes with new siding often receive higher appraisals and stronger offers. According to national housing data, vinyl siding replacement

Power washing roof and gutters to remove dirt, moss, and debris during routine maintenance.
Other Services

The Hidden Costs of Neglecting Gutter Cleaning

Gutters don’t get much attention until water starts pouring where it shouldn’t. Many homeowners underestimate the impact of clogged gutters until visible damage appears. What seems like a harmless buildup of leaves can quietly cause thousands in repairs. Gutter cleaning isn’t just seasonal upkeep; it’s essential home protection. What Neglecting Gutter Cleaning Costs  Most homeowners don’t associate clogged gutters with severe damage until too late. What seems like a simple chore can quietly snowball into high repair bills and lasting structural issues. These hidden consequences often start small and out of sight, making them easy to ignore. But the longer gutters stay blocked, the more damage they quietly cause elsewhere. Leads to Costly Structural Damage Gutter cleaning prevents rainwater from damaging your home’s two most expensive parts: the roofing and the foundation. When gutters overflow, water backs up under shingles or pools at the foundation line. That leads to roof leaks, warped walls, cracked foundations, and basement flooding. Left unchecked, these issues snowball into structural failure and massive repair bills. Water Overflow Destroys Roofing Materials Overflowing gutters let water linger at the roofline. That moisture seeps under shingles and begins to rot the underlayment and decking. As wood decays, it loses its load-bearing strength. Eventually, this damage shows as sagging ceilings or interior leaks. Proper gutter flow keeps water away from vulnerable roof edges. Foundation Cracks Start With Bad Drainage When water isn’t directed away from the home, it saturates the soil near the foundation. That constant pressure can crack foundation walls or shift the structure over time. It also invites water into basements and crawl spaces. Cracks worsen with freeze-thaw cycles, compounding the damage. Clean gutters with working downspouts help maintain solid ground around your home. Gutter Backup Causes Fascia and Soffit Rot The fascia board, located behind the gutter, is often made of wood. When gutters are clogged, water spills over and saturates this board repeatedly. Moisture seeps into surrounding soffits and trim, rotting the structure and creating openings for pests and insects. Dry, clear gutters help prevent hidden decay behind your siding. Seasonal Hazards Increase Winter Damage Risk Gutter blockages contribute to ice dams during colder months. Ice pushes water back under shingles as roof snow melts and refreezes at clogged gutters, causing hidden leaks that worsen over time. The extra weight can also warp gutters and rip them from the home. Cleaning gutters before winter helps avoid these seasonal disasters. Triggers a Cascade of Expensive Repairs Avoiding gutter maintenance leads to more than surface-level damage. The longer the delay, the more expensive it becomes to fix the aftermath. From flooded interiors to weakened structures, the costs can quickly multiply. Regular cleaning is far less costly than emergency repairs. Delayed Cleaning Leads to Costly Repairs Clogged gutters don’t stay minor for long. As water seeps where it shouldn’t, it ruins insulation, framing, and drywall. Repairs often involve wall demolition, mold remediation, and replacement materials. These expenses stack quickly compared to a routine cleaning service. Prevention is far more affordable than restoration. Curb Appeal and Home Value Drop Overflowing gutters often lead to stained siding, sagging troughs, and water-streaked walls. These visible issues make a home look poorly maintained. Homebuyers notice these signs and may lower offers or walk away. Gutter issues also impact appraised values during refinance or sale. Clean, functioning gutters contribute to overall property value. Insurance Claims May Be Denied Homeowner’s insurance doesn’t always cover water damage caused by neglect. Many policies exclude issues tied to poor maintenance, including clogged gutters. You could be stuck with the cost if a roof leak or foundation crack results from gutter overflow. Insurance companies expect homeowners to handle basic upkeep. Gutter cleaning helps protect your policy and your wallet. Creates Serious Health and Safety Risks Neglected gutters threaten your home’s structure and create unhealthy and unsafe conditions. From mold exposure to pest infestations, the hidden dangers worsen over time. Safe, dry homes start with working gutters. Mold and Mildew Thrive in Damp Spaces Water trapped in clogged gutters often leaks into attic spaces and wall cavities. These dark, damp environments are perfect for mold growth. Mold affects indoor air quality and aggravates breathing issues, especially for children and seniors. Long-term exposure can lead to respiratory conditions and allergic reactions. Dry interiors start with exterior water control. Pests Nest in Debris-Filled Gutters Leaves and standing water attract insects, rodents, and birds. Mosquitoes lay eggs in stagnant water, while rats and squirrels build nests in the buildup. These pests can move from gutters into roof vents and attic spaces. Once inside, they chew wires, tear insulation, and spread disease. Clean gutters remove their entry points. DIY Gutter Cleaning Can Cause Falls Homeowners often wait until gutters are overflowing before attempting to clean them. By then, the job is more complex and dangerous. Using ladders without safety gear increases the risk of serious injury. Falls from just one story up can cause fractures, head trauma, or worse. Professional gutter cleaners are trained and insured to handle the risk for you. Exposes Your Home to Weather-Driven Damage Rainy springs, storm-heavy summers, and icy winters all affect gutter performance. Regions with heavy rainfall or high winds see faster buildup and quicker failures. Homes in areas with snow face ice dam risks that turn minor clogs into full-roof leaks. Understanding your local weather helps set a smarter gutter cleaning schedule. Heavy Rainfall Overwhelms Clogged Systems When downpours hit, blocked gutters quickly overflow. Water spills over the sides, soaking your walls and eroding the soil around your foundation. In areas with frequent rain, the damage compounds fast. Roof leaks, siding stains, and basement floods often follow. Clean gutters help direct intense water flow safely away from your home. Ice and Snow Can Rip Gutters Off the Roof Winter creates unique pressure on neglected gutters. Snow buildup melts, refreezes, and forms ice dams inside the troughs. As the ice expands, it loosens screws and bends brackets. In some cases, entire gutter systems detach from the

Hurricane-damaged house roof in a suburban Florida neighborhood
Emergency Roof Repair

What Counts as Emergency Roof Repair?

A failed roof disrupts your life; it’s not just a simple problem. Leaks, holes, or structural collapse are more than a mess. They affect your safety, property value, and peace of mind. Some roof issues can wait; others need fast, professional attention. Knowing what counts as emergency roof repair helps you respond before things worsen. Acting quickly keeps the damage contained and protects your investment. Defining Emergency Roof Repair Emergency roof repair means immediate work is needed to stop fast-moving damage. It targets structural threats or hazards that could escalate within hours. That isn’t the same as planned maintenance or cosmetic upgrades. These repairs often follow storms, impact events, or sudden failures. The goal is to secure your home or building quickly and prevent secondary issues like mold, wood rot, or insulation damage. Timing matters because delays amplify repair costs and risk. How Roof Emergencies Usually Begin Most roofing emergencies result from weather, falling debris, or poor upkeep. Strong winds lift shingles, tree limbs crash through decking, and ice dams create water backups that infiltrate through nails and seams. Fires can warp framing and burn away barriers, and minor leaks that weaken the underlayment can lead to collapse. Some emergencies build over time, while others happen in a flash. Regardless of the trigger, the structure becomes weak once protective layers are breached. That vulnerability is what makes fast action critical. What Makes it an Emergency A missing shingle or cracked tile isn’t always urgent, but damage that exposes the roof deck or attic to rain becomes a priority. The key distinction is exposure and whether water is actively entering or the roof structure is shifting. Many homeowners misread non-emergencies as critical, making professional inspection essential. What looks small from the ground can hide deeper issues, while apparent damage might not be as urgent. The risk lies in guessing wrong and letting problems escalate. That’s where expert guidance can prevent unnecessary repairs or costly delays. How to Identify Emergency Roof Damage Recognizing early signs of roof failure helps you act before conditions worsen. Emergency damage isn’t always dramatic at first glance, and subtle symptoms like ceiling stains or attic odors often go unnoticed. The faster you detect damage, the fewer repairs you’ll need later. Visual checks after storms or unusual weather are a smart habit. Water, movement, or sagging always deserves closer attention. Responding early can mean the difference between a patch and a replacement. Active Leaks or Indoor Dripping Water If water is dripping indoors, your roofing has likely failed, and water intrusion can lead to stained ceilings, warped floors, and electrical hazards. It often means the leak has reached past the shingles into the insulation and rafters. Waiting even one day can cause mold growth, drywall collapse, or circuit issues. Use a bucket to catch water and call a professional roofer immediately. Do not ignore even slow, steady drips; they’re not minor. Once water gets in, it finds its way to everything below. Missing, Curled, or Broken Shingles Wind can lift and tear off shingles, exposing the surface underneath and allowing moisture to seep in. While a few shingles might not seem urgent, their location matters, especially near valleys or flashing. Water enters faster when these vulnerable spots are exposed. A roofing contractor can assess urgency based on layout and local climate conditions. Inspecting early is always safer than fixing what could have been avoided. Minor damage becomes widespread quickly when left unchecked. Sagging Areas or Visible Roof Line Dips When a roof sags, the internal structure could be compromised, often pointing to soaked decking or deteriorated rafters. Long-term leaks may have caused slow rot in older homes that weakens support. Structural sagging is dangerous and may precede partial collapse if ignored. Avoid entering attics with visible sag or shifting frames, and never attempt to prop them up yourself. Sagging shows that the roof’s load-bearing system is under stress. This condition needs professional attention right away. Visible Holes or Impact Damage Storms and falling debris can create obvious roof punctures; even a small opening can let gallons of water in. Hail can crack tiles or damage seams around chimneys and vents, creating pathways for moisture. If you can see daylight through your roof from inside, that’s an emergency. Likewise, if debris is lodged in your roof, avoid removing it yourself; contact roofing experts who can handle it safely and prevent secondary issues. Acting quickly minimizes water intrusion and structural decay. Common Emergency Roof Repair Situations Due to the scale and speed of damage, certain events are nearly always emergencies. These include natural disasters, fire events, and impacts from trees or objects. Immediate repair helps prevent complete structural loss or high restoration costs. Knowing the qualifying situations saves time and confusion when you’re under pressure. Fast recognition of the issue enables you to choose the correct response.  Damage from Wind, Rain, or Hail Storms can tear off shingles, loosen flashing, or dump inches of rain in hours, leaving your roof vulnerable. Wind uplift removes materials from the edges, allowing water intrusion that spreads rapidly. Hail breaks tiles and bruises asphalt shingles, weakening their integrity and shortening roof lifespan. Post-storm inspections are critical, even if you don’t see water immediately. What looks fine from the ground might hide broken seals or punctures. Hidden damage turns into leaks without warning. Fire or Electrical Short Roof Damage Fires often damage more than what’s visible, as heat warps sheathing and dries out framing, making it brittle. Firefighters’ water hoses add moisture that seeps deep into insulation layers and attic voids. After fire suppression, roofs often look intact but aren’t structurally sound. A roof inspection must follow any residential or commercial fire event. Timely checks can prevent total roof failure and help validate insurance claims. Structural safety always comes first after a fire. Tree Falls or Structural Collapse Tree limbs and full trees can crash into roofing systems during storms, crushing beams and piercing shingles in one blow. Even partial impacts shift weight loads

Close-up of a contractor’s hands installing vinyl siding with a hammer and level.
Siding Installation and Replacement

Understanding the Cost to Replace Vinyl Siding

Vinyl siding wears down, fades, and cracks over time. When it does, replacing it becomes less about curb appeal and more about protection. Homeowners often hesitate because the costs feel unclear or unpredictable. However, avoiding the project can lead to worse problems hiding beneath the surface. Knowing what drives the cost to replace vinyl siding helps you plan smarter, spend wiser, and avoid unpleasant surprises. What is the Average Cost to Replace Vinyl Siding? The average cost to replace vinyl siding ranges from $6,000 to $16,000, depending on the home’s size, material quality, and location. Replacing vinyl siding is a major exterior upgrade, both visually and financially. Costs vary depending on where you live, your home’s square footage, and labor rates. Understanding the typical price range is essential to avoid being overcharged or underprepared.  National Cost Range and Per Square Foot Pricing Vinyl siding replacement typically costs between $ 6000 and $ 16000, though prices can shift depending on local market conditions. That translates to an average of two dollars and fifty cents to ten dollars per square foot installed. Several factors, including material grade, local labor, and home design complexity, affect this range. Basic siding in standard colors is more affordable. Insulated or textured panels, on the other hand, increase the total cost. These national estimates may vary depending on your region, contractor availability, and project timing. How Much Does Siding Cost by Home Size? Home size and wall surface area significantly impact overall siding cost. A 1,200-square-foot ranch-style home typically costs around $7,000 to re-side. A two-story house with more wall surface often ranges between $10,000 and $15,000. Depending on layout and design, custom or multi-level homes generally start at $15,000 and may exceed that. Homes with architectural features like dormers or wrap-around porches require additional material and labor. Similarly, houses with aging or damaged exteriors may need extra prep, which raises the final cost. These estimates are subject to change and can vary by region, contractor, and market conditions. Labor vs. Material Costs in Vinyl Siding Jobs Materials comprise 40% to 60% of the total cost in most vinyl siding projects. The rest is labor. Experienced siding contractors may charge higher hourly rates, but their efficiency can reduce total installation time. Basic horizontal panels install quickly, keeping labor costs low. However, specialty siding like board-and-batten or shakes takes longer and drives up labor fees. What Affects the Cost to Replace Vinyl Siding? Several factors impact the total cost to replace vinyl siding, including material quality, home design, labor, and removal of old siding. Every house has unique challenges that can shift pricing well above or below the average. Understanding what drives these differences helps you prepare, budget, and compare contractor estimates more effectively.  Type and Quality of Vinyl Siding The grade of vinyl you choose plays a significant role in your project’s total cost. Thinner, entry-level panels are more affordable but less durable and may fade faster. Mid-grade vinyl balances price and performance, often with improved insulation and impact resistance. Premium vinyl siding includes foam backing, textured finishes, or enhanced UV protection. These high-end options cost more upfront but can reduce long-term maintenance and energy bills. House Design and Accessibility Simple, single-level homes with flat walls are typically the least expensive to side. More complex structures, such as multi-story houses, homes with steep slopes, or properties with tight access, require more labor and equipment. Contractors may need scaffolding, ladders, or lifts to reach upper levels, especially in narrow spaces. Homes with curved walls, gables, or intricate trim details also demand more precise installation. These challenges translate into higher labor fees and extended project timelines. Local Labor Rates and Seasonal Demand Labor costs for vinyl siding installation vary depending on your location and the time of year. Urban areas have higher rates due to contractor demand, higher overhead, and limited availability. Rural areas might offer lower hourly rates, but the number of qualified installers may be limited. During peak seasons like spring and fall, siding contractors are busier, and prices often reflect that demand. If you’re flexible, scheduling during off-peak months can help reduce your quote. Old Siding Removal and Disposal Fees Tearing off old siding is a common but sometimes overlooked cost. Contractors may charge per square foot to remove existing materials, especially if multiple layers or damage are involved. Disposal fees also vary depending on your region and local landfill policies. If your home has asbestos siding, removal will require special handling and additional costs. Your contractor may not include these charges in their estimate, so always clarify what’s covered. How Does Vinyl Siding Compare to Other Materials? Vinyl siding remains one of the most cost-effective and low-maintenance exterior cladding options. While several alternatives exist, each comes with its balance of cost, durability, and upkeep. Comparing materials helps homeowners make informed decisions based on long-term value.  Vinyl vs. Fiber Cement Siding Fiber cement siding is heavier and more impact-resistant than vinyl. It holds up well to fire, wind, and pests, making it a durable choice for many climates. However, it typically costs more to install, both in materials and labor, due to its weight and handling requirements. While fiber cement can last longer, it may need repainting over time, adding to maintenance costs. Vinyl, by contrast, is lighter, easier to install, and doesn’t require painting, making it more affordable upfront and over time. Vinyl vs. Wood and Engineered Wood Traditional wood siding has a natural aesthetic, but it comes with higher maintenance demands. It needs regular sealing or painting and is more vulnerable to moisture and pests. Engineered wood offers improved resistance and durability, but still requires upkeep and can be prone to swelling. Vinyl, on the other hand, is resistant to rot, insects, and fading. While wood may appeal to homeowners seeking a rustic or high-end finish, vinyl is often chosen for its simplicity, longevity, and lower lifetime cost. Why Vinyl Remains a Popular Choice Vinyl siding continues to dominate the market because it

Hand marking a calendar date with a red marker to schedule a roof replacement.
Roofing Services

What Homeowners Should Know About a Long-Term Roof Replacement Schedule

A home’s roof isn’t just part of the structure; it’s a shield that keeps everything inside safe and secure. Over time, even the toughest roofing materials start to break down. Many homeowners don’t think about their roofs until a leak appears or shingles start flying off. Waiting until something goes wrong costs more, creates stress, and puts your home at risk. A long-term roof replacement schedule isn’t just helpful; it’s a key strategy for savvy homeowners to stay one step ahead. Why a Roof Replacement Schedule Matters Planning your roof’s future is more than just being prepared; it’s about control. Instead of reacting to disasters, you steer the timeline, the cost, and the outcome. Roofs have predictable life cycles, but too many people ignore the warning signs until it’s too late. A roof replacement schedule turns guesswork into a plan that protects your home and budget. Your Roof Isn’t Built to Last Forever Roofs break down like anything exposed to sun, wind, and rain. Asphalt shingles may last 20 years, while metal roofs can last up to 40 years. However, even the best roof eventually wears out. Minor damage can build up over time and become a major issue. Most leaks and rot happen after years of slow, hidden decay. Replacing your roof on time avoids that downward spiral. Predictable Maintenance Saves You Money Minor repairs now prevent substantial expenses later. A roof replacement schedule helps you handle costs before they spike. Emergencies are always more expensive than planned replacements. Roofers charge more during storms or peak seasons. You also avoid interior damage, such as ruined drywall or moldy insulation. Home Value and Insurance Depend on Roof Health Insurance companies often reduce coverage for aging roofs. They may even cancel policies if the roof looks worn. On the other hand, a newer roof lowers your premium. Buyers also consider the age of the roof during home inspections. A documented schedule shows them you’ve maintained your property. Understanding the Roof Replacement Timeline A roof replacement schedule starts with knowing what to expect. Different materials have different lifespans. Climate, roof design, and even tree coverage play a role. With this in mind, it’s easier to set realistic targets. Life Expectancy by Roofing Material Not all roofs age the same way. Asphalt shingles are an affordable option, but they typically last 15–25 years. Metal roofs can last 40 years or more with care. Tile and slate often last past 50 years, but they cost more upfront. Wood shakes last between 20 and 30 years if properly maintained. Your material choice affects everything from replacement timelines to savings. Factors That Affect Roof Longevity Quality installation is key. A poorly installed roof will fail more quickly, regardless of the material. Storms, snow, and direct sunlight also shorten lifespan. Homes in coastal or humid areas need more frequent inspections. Good attic ventilation and insulation slow wear from the inside out. Each of these variables should be part of your schedule planning. How to Create a Long-Term Roof Replacement Schedule You can’t build a reliable schedule without knowing your starting point. Assessing the current condition of your roof is the first step. From there, you can work with professionals or use digital tools to track repairs and plan future replacement dates. A proactive schedule is like a maintenance calendar with real consequences. Start With a Professional Roof Assessment Every long-term schedule starts with facts. Have a roofer inspect for damage, weak spots, and structural issues. They’ll check flashing, shingles, gutters, and attic ventilation. You’ll get a detailed report that helps set realistic expectations. Keep records from each visit to build a timeline. Use Time-Based and Condition-Based Triggers Mark the date of your roof’s installation, the warranty period, and the target replacement year. Record signs like missing shingles, mold, or water damage. Combine time-based goals with condition alerts to stay on top of changes and ensure timely updates. If a bad storm hits, do an unscheduled checkup—store pictures and notes in folders or digital trackers. Involve the Same Roofing Company Over Time Using one trusted roofer keeps things simple. They track your home’s history and know which issues keep recurring. They can recommend upgrades as materials improve. Long-term relationships often lead to better pricing and priority service. It also removes guesswork when you’re unsure who to call. Long-Term Cost Planning for Roof Replacement Many homeowners put off replacements due to the cost. But spreading expenses over time makes them more manageable. Planning for costs instead of reacting to them changes the whole experience, so you won’t feel caught off guard when the time comes. Understand the Full Cost of a Roof Replacement The cost depends on materials, square footage, and the complexity of the roof. Shingles are less expensive than slate or metal but require more frequent replacement. You’ll also pay for labor, removal of the old roof, and permits. Prices shift depending on the market and region. Get quotes every few years to stay updated. Save Over Time Instead of All at Once Set aside money in a dedicated home repair fund. It doesn’t have to be huge, just consistent. Even saving a little each month adds up by year ten or 15. This cushions you against price jumps and labor shortages. It also prevents you from needing emergency financing. Explore Flexible Financing Options If savings fall short, there are still options. Home equity loans and lines of credit often have low rates. Some roofing companies offer zero-interest financing or payment plans. Read the terms carefully to avoid high fees. Warranties may also cover partial costs if the installation was recent. Seasonal Checks in a Roof Replacement Schedule Regular checkups give you peace of mind. They catch problems before they get worse. Including these tasks in your long-term roof replacement schedule keeps things running smoothly year after year. What to Inspect Each Spring and Fall After storms, look for broken or curling shingles. Check flashing near chimneys and roof valleys. Clear debris from gutters and roof

Close-up shot of rain gutter pressure washing during service.
Other Services

How Gutter Cleaning Services Prevent Roof and Foundation Damage

Every storm puts pressure on your home’s defenses. When rainwater flows unchecked, your roof and foundation take the brunt. Many homeowners don’t notice the signs until the damage shows up indoors. What starts as a small blockage often snowballs into expensive issues. Gutter cleaning isn’t just about tidiness, but also about protection from real and rising threats. Why Gutter Cleaning Services Matter Beyond Maintenance Gutter cleaning isn’t just routine upkeep; it’s a frontline defense for your home. Gutters constantly collect debris from wind, wildlife, and storms; without regular clearing, they clog and fail to function correctly. It turns a protective system into a hidden threat, letting water spill into places it shouldn’t. Routine service keeps gutters efficient, prevents silent damage, and strengthens your home’s resistance against costly repairs. How Gutter Cleaning Services Protect Roofs and Foundations Clogged gutters don’t just look messy; they quietly weaken your home’s defenses. Rainwater meant to drain away begins, causing problems above and below. The longer it’s ignored, the more damage builds up behind the scenes. Gutter Cleaning Services Prevent Roof Water Damage Your roof isn’t designed to handle water pooling at its edges. Shingles, underlayment, and decking rely on fast drainage. When gutters clog, that system breaks down. Gutter cleaning services keep everything flowing, protecting one of your home’s most exposed surfaces. Blocked Gutters Overflow and Soak Roof Edges Gutters filled with leaves, twigs, and debris stop water in its tracks. Instead of draining away, the water spills backward onto the edge of your roof. Over time, excess moisture seeps into the fascia boards and the roof deck. Wood absorbs water, expands, attracts insects, and breaks apart. The damage then creeps under shingles, weakening them from below and causing leaks inside the home. Ice Dams Form When Gutters Stay Full in Winter In colder months, clogged gutters trap standing water. As temperatures drop, that water freezes and creates ice dams. Melted snow from higher on the roof can’t flow past the frozen sections. The water pools behind the dam and pushes up under the shingles. It leads to cracked shingles, water-stained ceilings, and damage to the attic insulation. Standing Water Encourages Roof Material Breakdown Constant exposure to dampness accelerates wear on roofing materials. Leaves and sludge hold water like sponges, keeping roof edges wet for days. This moisture softens tar seals, weakens shingle adhesive, and encourages moss to spread. Over time, the shingles curl, blister, or detach altogether. Gutter cleaning services remove that buildup before it eats away at your roof. Gutter Weight Can Pull at Roof Structures Debris-filled gutters become heavy, especially after rain. That extra weight pulls down on the hangers, brackets, and fascia boards. Sometimes, the gutter detaches completely, ripping part of the roofline with it. Even without detachment, this strain weakens connections and creates minor entry points for water to infiltrate. Regular cleaning prevents this strain and the structural stress it causes. Gutter Cleaning Services Protect Foundations from Cracks Your gutters do more than protect the roof. They move thousands of gallons of water away from your home’s foundation yearly. If that system fails, water soaks into the ground near the base. Over time, that pressure causes cracks, erosion, and shifting. Water Overflow Saturates the Soil Around the House When gutters overflow, water lands right next to your foundation. The soil becomes saturated and heavy, pushing against the basement walls. As the pressure increases, small cracks form in the concrete. That moisture seeps inside, leading to mold and mildew. Eventually, those cracks grow, weakening the entire base structure. Excess Moisture Undermines Slabs and Basement Walls Foundation slabs need dry, compacted soil beneath them. When water continues to enter the same spots, the soil expands, softens, or erodes. This shift causes the slab to become uneven and vulnerable to cracking. Basements also absorb moisture, leading to musty odors and crumbling walls. Gutter cleaning helps avoid this chain reaction altogether. Erosion Washes Away Landscaping and Ground Support Overflowing water doesn’t just pool; it also flows with force. That current can strip mulch, gravel, and even topsoil from flowerbeds. Paths become uneven, roots get exposed, and the ground loses shape. More importantly, the house loses support from the earth beneath it. Keeping water flowing properly prevents this slow yet destructive erosion. Gutter Cleaning Services Help Identify Problems Early Timely cleaning doesn’t just clear blockages; it allows professionals to identify and address potential issues. Trained eyes can see what most homeowners miss from the ground. That insight adds extra value to every visit. Technicians Detect Loose Gutters and Sagging Sections Over time, the hardware that supports your gutters can shift or loosen. Roofing technicians check for sagging spots that hold water and pull away from the fascia. Addressing those minor shifts helps keep water flowing and prevents more significant issues from developing later. They also inspect for rusted screws and brackets that weaken in wet weather. These repairs, while small, keep the entire system intact and reliable. Professionals Catch Minor Roof or Gutter Damage First Crews on the ladder often see damage that hasn’t yet reached the living space. They spot lifted shingles, minor rust spots, or wear around gutter seams. These early signs indicate areas that may soon leak or fail. Fixing them during routine service stops damage before it spreads. Homeowners avoid the shock of high repair bills down the road. Seasonal Cleaning Matches the Weather’s Impact Each season brings different threats to your gutter system. Spring pollen, summer storms, autumn leaves, and winter freezes all leave their mark. Gutter cleaning services adjust their approach to the season’s challenges. This targeted care ensures that systems remain functional throughout the year. Consistent cleaning throughout the year makes seasonal transitions smoother and safer. Technicians Inspect Downspouts and Water Direction It’s not just the gutters; downspouts are key in water flow. Clogs at the base or bends in the spouts stop drainage and cause backflow. Professionals test and clear downspouts to restore full function. They also check where the water lands to confirm that

A shingled roof filled with autumn leaves clogging the rain gutters.
Roofing Services

When to Schedule Roof and Gutter Maintenance for the Best Results

Homeowners tend to notice roofs and gutters only when something goes wrong. A leak stains the ceiling, or water overflows during a storm. Suddenly, it’s an emergency repair that could’ve been avoided. Roof and gutter maintenance isn’t about putting out fires. It’s about preventing expensive problems before they start. Why Roof and Gutter Maintenance Timing Matters Every home breathes through its roof and gutters. These two systems quietly manage moisture, redirect runoff, and protect the structure underneath. But timing their maintenance wrong can weaken that defense. Understanding the seasonal shifts in roof and gutter performance helps prevent long-term damage. Protects Your Home’s Structural Integrity A well-timed maintenance check helps prevent moisture from seeping into your home’s bones. Once water finds a crack, it doesn’t stop; it spreads. Wood rot, drywall stains, and warped flooring can follow. Seasonal upkeep stops these problems before they grow out of control. It keeps your foundation, walls, and attic dry and intact. Avoids Costly Repairs Down the Line Postponing roof or gutter maintenance leads to avoidable expenses. What starts as a loose shingle becomes water damage in your attic. Clogged gutters may lead to landscaping erosion or a cracked foundation. Minor fixes cost a fraction of what complete repairs demand. Routine scheduling reduces surprises and stretches your maintenance budget further. Prevents Health Hazards Like Mold and Mildew Trapped moisture damages materials and fuels mold growth. Mold thrives in dark, damp places like ceiling insulation and walls. Once it spreads, cleanup becomes complex and costly. Scheduled gutter cleanings and roof inspections significantly reduce these risks. Maintaining airflow and water control protects your health as much as your home. Timing is Even More Crucial for Commercial Roofing Commercial roofs cover a larger surface area and withstand heavier wear. They often support HVAC units, vents, and foot traffic, which increases stress. Flat or low-slope designs make drainage slower and more prone to blockages. Seasonal timing helps prevent leaks, ponding, and structural risks. Delaying service can mean business downtime or code violations. Roof and Gutter Maintenance in Spring Spring is a recovery season for your roof and gutters. It follows heavy winter wear and brings unpredictable rain. Maintenance during this time helps reset your home’s defenses and prepares it for the wet months ahead. Timing it right means catching winter damage before it worsens. Assessing Winter Damage Ice, snow, and temperature swings stress roofing materials. Due to fluctuations in weight and temperature, shingles can curl, crack, or detach. Gutters often sag from ice buildup or separate at the seams. Spring inspections catch these problems before rain further exposes them. Addressing damage early keeps your roof watertight and stable. Clearing Debris and Organic Matter Winter storms drop twigs, pine needles, and leaves across rooftops. These block gutters and clog downspouts once spring rains begin. Overflowing gutters, flood basements, and rotting fascia boards. A thorough cleaning ensures water flows freely away from the house. It’s the first step toward controlling seasonal moisture. Prepping for Heavy Spring Rains Spring storms arrive fast and often bring heavy rain. Gutters need to move large volumes of water quickly and efficiently. Leaks or blockages slow that process, sending water backward under shingles or into the attic. Testing flow direction and sealing weak joints improves drainage. It’s a simple step with powerful protection. Why Summer is Ideal for Roof and Gutter Upgrades Summer gives you the longest dry stretches of the year. These warm, sunny conditions make it the best time for roof repairs and upgrades. Roofing contractors can safely work on your roof without slipping hazards. The materials used for sealing and weatherproofing also perform better in heat. Repairing Cracked Shingles and Loose Gutters Heat reveals weak spots created by past storms or age. Cracked shingles become brittle in the sun. Loose gutters can pull away, become detached, or rust at attachment points. Summer is the perfect time to replace these parts. Repairs hold longer, and prep your home for future stress. Sealing and Waterproofing Roof sealants and waterproofing treatments require dry surfaces to bond well. Summer heat speeds up the curing process. Professionals can apply coatings more efficiently, eliminating weather-related delays. These treatments add years of protection to your roof. They also help reflect heat, reducing cooling bills. Inspecting for UV and Heat Damage Constant sun exposure weakens roofing materials over time. Asphalt shingles lose granules, sealants crack or bubble, and gutter seams may dry out and split. An inspection focused on UV wear highlights these issues. Replacing or reinforcing affected areas before fall weather adds stress is easier. Fall Roof and Gutter Maintenance is Non-Negotiable Fall is the season that decides how well your home survives winter. Trees drop leaves rapidly, rain becomes more frequent, and colder air moves in. That is the final chance to tune up your roof and gutters before snow or freezing rain arrives. Delaying fall maintenance leaves your home vulnerable for months. Clearing Leaves and Organic Blockages Fall foliage quickly fills gutters and roof valleys. When debris clogs drainage systems, water gets trapped and refreezes, leading to cracked gutters, roof leaks, or dangerous ice dams. Clearing leaves every few weeks during fall prevents buildup and keeps water flowing as temperatures drop. Installing Gutter Guards Before Snow Season Gutter guards reduce the time spent cleaning leaves during fall. They also help block ice from forming inside the gutter channel. Installing them before winter helps minimize damage from snowmelt refreezing. It’s an efficient upgrade with long-term savings. Properly chosen guards still allow water to exit during storms. Inspecting Drainage Before Freezing Conditions Arrive Once winter begins, frozen gutters can’t be adjusted. That’s why it’s smart to test every downspout and gutter pitch beforehand. Water should flow at a downward angle and exit without pooling. Adjustments made in the fall prevent standing water that could freeze. It’s a minor tweak with lasting benefits. Reinforcing Flashing and Chimney Seals Roof flashing around vents, skylights, and chimneys often loosens with age. These seams allow water to enter when snow accumulates. Fall is

Modern homes with fiber cement siding and snow-covered roofs in winter.
Siding Installation and Replacement

Replacement Siding That Adds Real Value to Your Property

home’s siding often shapes a buyer’s first impression and sets the tone for the rest of the experience. Worn, outdated panels suggest deeper issues, even if everything inside is pristine. On the other hand, clean, modern siding signals care, durability, and a wise investment. Choosing the right replacement siding can significantly enhance a property’s value, transforming it from average to standout. Why Replacement Siding is a Smart Investment The exterior of your home is more than a shell; it’s a financial asset and the face of your property. Siding, when in poor shape, immediately drops perceived value. But new siding does more than add visual appeal. It adds real value that’s tied directly to resale potential and structural protection. Siding Impacts More Than Just Appearance Many people think siding is purely cosmetic, but it serves a much broader purpose. It shields the home from rain, wind, pests, and harmful UV rays. When siding is damaged or outdated, it invites moisture, mold, and structural rot. These issues silently lower your home’s lifespan and appraisal value. Replacing it early prevents more extensive siding repairs that cost significantly more. Homebuyers Notice First Impressions Real estate professionals agree that homes with fresh, modern siding sell faster. First impressions carry weight, and tired siding drags everything down. Clean, well-fitted panels indicate that the home has been well-maintained. New siding also offers a better canvas for modern trim and color combinations. Buyers connect instantly with homes that look move-in ready. Siding Replacement Often Delivers a Strong ROI Few home upgrades offer a return as strong as replacement siding. According to Remodeling Magazine’s Cost vs. Value report, fiber cement siding recoups up to 85% of its cost. Vinyl siding is close behind. These numbers often outperform kitchen remodels or bathroom upgrades. It’s one of the few upgrades that pay off financially and visually. Replacement Siding Options That Really Add Value Choosing siding is about practicality, climate, cost, and long-term results, not just taste. The best materials perform under pressure while giving your home a crisp, updated look. The following are the top-performing siding options that homeowners choose to raise property value while keeping maintenance costs low. Fiber Cement Siding Fiber cement siding blends the beauty of wood with toughness that wood can’t match. It resists fire, insects, and rot with ease. Brands like James Hardie offer styles that mimic real wood grain but last far longer. While the upfront cost is higher than vinyl, its long-term performance justifies the price. It holds paint well and suits modern, farmhouse, and craftsman styles equally well. Engineered Wood Siding This type of siding offers the warmth of real wood with reduced maintenance. Made from wood fibers and resin, it can resist cracking, warping, and pest damage. It’s also less expensive than fiber cement but still offers strong curb appeal. Many products are treated to withstand moisture better than traditional wood. It’s a smart option for homeowners who love a classic look but want reliability. Insulated Vinyl Siding Vinyl siding remains a popular choice due to its affordability and durability. When paired with built-in insulation, it improves energy efficiency and comfort inside the home. Insulated vinyl also helps reduce noise from outside, adding to its appeal. It’s available in a wide range of colors and styles, many of which mimic more premium materials. Homeowners on a budget can still upgrade both form and function. Metal Siding (Aluminum or Steel) Metal siding suits rural and urban homes with its clean lines and toughness. It resists mold, insects, and fire and won’t warp in extreme temperatures. Steel is stronger and less prone to dents than aluminum, but both offer decades of use. These materials also reflect heat, helping keep indoor temperatures stable. For modern homes, metal siding adds an industrial edge with purpose. Wood Siding for High-End Appeal Though high maintenance, natural wood siding still appeals to luxury homes. Cedar and redwood offer timeless character that many buyers still seek. Wood siding requires sealing, painting, and regular checks for moisture issues. But in the right neighborhood, it can support premium pricing. It’s often best for historic properties or upscale renovations. Choosing the Right Replacement Siding for Your Property Matching the right siding to your home isn’t just about trends; it’s about fit. Climate, architecture, and surrounding homes all matter. You want a material that performs well while complementing the area and your long-term goals. Below are critical factors that help homeowners make smart siding decisions. Match Siding to Your Region’s Climate Different climates demand different siding strengths. Humid areas benefit from rot-resistant materials, such as fiber cement or vinyl. Cold regions need siding that won’t crack in freezing temperatures, such as insulated vinyl or engineered wood. Dry, hot areas may require materials that resist UV fading and heat expansion. Matching siding to weather conditions avoids future damage. Blend Style With Neighborhood Standards Siding should enhance your home’s appearance without clashing with neighboring properties. Choosing the wrong color or material can make a home feel out of place. Neutral tones with subtle accents often appeal to a wide range of buyers. If your neighborhood follows an HOA, check the guidelines before committing. A mismatch could affect resale value and approval processes. Set a Practical Budget and Future Plan Think about both upfront costs and lifetime expenses. Some siding may be cheaper now, but it wears out faster. Others may cost more but last two or three times longer. Compare material warranties, installation costs, and upkeep requirements. It’s smarter to stretch your budget for a material that won’t need replacing again for decades. Coordinate Siding With Other Exterior Projects Timing is crucial when planning to replace windows, roofing, or trim. Replacing siding after these upgrades helps create a seamless exterior. You’ll avoid gaps, flashing issues, and patchy color transitions. Coordinating projects also helps reduce labor overlap and saves money; long-term planning results in a stronger, more consistent finish. How Replacement Siding Affects Home Appraisal Value Siding plays a more direct role in home appraisals

A contractor installing a rain gutter.
Uncategorized

Why Timely Rain Gutter Repair Can Save You Thousands in Water Damage

Gutters are often an overlooked part of a home’s exterior, yet they serve as one of the most critical lines of defense against water intrusion and damage. When functioning correctly, gutters redirect rainwater away from your home’s foundation, roof, siding, and landscaping. But when they’re clogged, broken, or pulling away from the structure, the risks multiply quickly—and so do the costs. Timely rain gutter repair is not just about maintenance; it’s a strategic investment that can save you thousands in preventable water damage repairs. Rain Gutter Repair Protects Your Home’s Foundation When gutters become damaged or clogged, water no longer flows away from your home as it should. Instead, it pools around the base of your house and slowly seeps into the ground near your foundation. This ongoing saturation increases hydrostatic pressure, which can lead to cracks, shifting, or total foundation failure. A timely rain gutter repair diverts this water safely away, preserving your home’s structural integrity and avoiding massive repair bills. Even minor gutter issues, if ignored, can result in thousands of dollars in foundation damage. Addressing problems early helps maintain stable moisture levels and preserves the long-term value of your property. Preventing Roof Leaks Starts With Rain Gutter Repair Gutters that can’t drain water effectively often cause it to back up under shingles and roofing materials. Once that water enters your roof deck or attic, it causes rot, mold, and active leaks. These roofing problems often go unnoticed until significant interior damage has occurred. Regular rain gutter repair prevents this by ensuring water flows away from your roof rather than sitting stagnant along the edge. This proactive maintenance helps you avoid emergency roofing services and insurance claims. Clean, functioning gutters are your roof’s first line of defense against water intrusion. Rain Gutter Repair Stops Siding and Fascia Damage Water running over the sides of your gutters will travel directly down your siding and soak the fascia boards beneath your roof. Over time, this constant exposure leads to warping, discoloration, and eventual rot. These components are not just aesthetic; they help protect your home’s shell from the elements. Timely rain gutter repair ensures that water doesn’t ever reach these sensitive areas in the first place. Protecting Driveways and Walkways With Rain Gutter Repair Uncontrolled rainwater can quietly damage your paved surfaces over time, resulting in severe and costly issues. Consistent rain gutter repair helps prevent damage by keeping water away from vulnerable areas, such as driveways and walkways. Downspout Placement Proper downspout placement ensures that water is directed away from the pavement rather than pooling or running across it. Misplaced downspouts often contribute to cracks and erosion along the edges of concrete and asphalt. By guiding runoff to safe drainage zones, this minor adjustment has a significant impact on the pavement’s longevity. Drainage Control Effective drainage control prevents water from flowing toward high-traffic areas, such as walkways and driveways. It reduces the risk of freeze-thaw damage in colder climates and limits erosion in warmer ones. Keeping runoff in check preserves the integrity of your paved surfaces year-round. Surface Protection By diverting water properly, rain gutter systems reduce the chance of structural damage to sidewalks and driveways. This protection helps surfaces remain level, safe, and visually appealing over time. Routine gutter repairs play a direct role in extending the life of outdoor paved areas. Rain Gutter Repair Preserves Your Home’s Interior When moisture penetrates through the exterior of your home, it can soak into insulation, walls, and ceilings, which causes staining, material degradation, and even dangerous mold growth behind walls and above ceilings. These interior damages are expensive to diagnose and fix, often requiring demolition and replacement. Proactive rain gutter repair prevents water from breaching your home and reaching these sensitive areas. Effective gutters also relieve hydrostatic pressure that can push moisture through foundation walls. Keeping water outside ensures a healthier indoor environment and protects your investment. The Cost of Delay Far Exceeds Rain Gutter Repair Costs Waiting to fix a gutter issue may feel harmless, but the damage multiplies over time. What starts as a loose bracket or minor crack can spiral into water-soaked wood, foundation settlement, or a collapsed gutter system. Basic rain gutter repair costs are lower than those for structural or water damage repairs. Investing in early fixes is not just smart—it’s financially necessary. Routine maintenance catches problems before they escalate into emergencies. Avoiding delays ensures your home remains protected through every season. Rain Gutter Repair Extends the Life of Your Gutters Neglected gutters degrade faster, rust sooner, and sag more easily. Minor issues, such as clogged joints or separated seams, can eventually lead to total system failure. Keeping up with timely rain gutter repair helps preserve the entire system and extends its serviceable lifespan. This timely repair reduces the frequency and cost of full gutter replacements, saving homeowners thousands of dollars. Regular cleaning and sealing also prevent ice dams and corrosion. Well-maintained gutters function more effectively and last significantly longer than those that are ignored. Catching Problems Early With Rain Gutter Repair Many serious gutter problems begin with signs that are easy to overlook, such as subtle leaks, uneven flow, or slow drainage. With regular inspections and fast action, these early-stage issues are cheap and easy to resolve. If left unchecked, they evolve into major failures requiring complete sections to be replaced. Staying alert and proactive with rain gutter repair keeps minor issues from growing into costly ones. Homeowners should schedule seasonal checks, especially after storms or when heavy debris has accumulated, to ensure their property is well-maintained. Early intervention helps avoid emergencies and ensures your system stays efficient. Signs You Need Immediate Rain Gutter Repair When your gutter system begins to show signs of trouble, it’s essential to act promptly. Minor issues can escalate into severe water damage if left unaddressed. These issues can be easily spotted if you know what to look for. Sagging or Pulling Away Gutters Gutters that sag or detach from the fascia board indicate that they’re overloaded or

A contractor installing vinyl siding.
Services

What to Expect During a Vinyl Siding Installation Project

Vinyl siding installation is a popular home improvement project that can dramatically enhance the look and protection of your home’s exterior. Whether replacing aging siding or upgrading for the first time, knowing what to expect can help you prepare and reduce stress. This guide will walk you through every step of the vinyl siding installation process, from planning to clean up, so you know exactly what to anticipate. Why Vinyl Siding Installation is a Smart Choice Choosing vinyl siding for your home is practical due to its many benefits. Vinyl siding offers excellent durability against weather, insects, and fading. It is also affordable compared to other siding materials and requires minimal maintenance over the years. The versatility in colors and styles means it can complement nearly any home design, boosting curb appeal without frequent upkeep. This combination of protection, style, and cost-efficiency explains why vinyl siding installation remains one of the most popular exterior upgrades. Planning Your Vinyl Siding Installation Project Proper planning is key to a successful siding installation. During planning, you will meet with your contractor to review your home’s measurements and discuss design preferences. In this stage, you’ll choose the style, color, and special features like insulation or decorative trim. Setting a clear budget and timeline is crucial to avoid surprises later. Thorough preparation ensures the project aligns with your expectations and home needs. Scheduling a Professional Consultation Meeting with a siding expert helps determine what materials and styles best suit your home. The professional will take precise measurements and evaluate the current state of your exterior to identify any potential challenges. This consultation is also the time to ask questions and get expert recommendations tailored to your climate and home architecture. Selecting the Style and Material Vinyl siding comes in many styles, including traditional lap, vertical panels, shakes, and scallops. Choosing the right style can enhance your home’s aesthetic appeal and complement its features. Your contractor can explain the pros and cons of each style and help you find a material grade that balances durability and budget. Preparing Your Home for Vinyl Siding Installation Before work begins, your home and yard must be ready to accommodate the installation team. This preparation involves clearing away outdoor furniture, decorations, and plants that could obstruct access to your walls. It also means protecting your interior by removing breakables near exterior walls, as noise and vibrations are common. Proper preparation helps the installers work efficiently and minimizes disruptions. Clearing the Exterior Work Area Unobstructed access around your home helps the crew move ladders, scaffolding, and materials easily. It also reduces the risk of accidental landscaping or personal belongings. Clearing the area ensures the team can maintain a safe work environment and complete the job efficiently. Protecting the Interior of Your Home Although the installation happens outside, vibrations and noise may travel indoors. Moving fragile items and valuables away from exterior walls can prevent accidental damage during the work. Additionally, closing windows near the work zone helps minimize dust and debris from entering your home. Removing Old Vinyl Siding and Inspecting the Structure If your home has existing siding, it must be removed for the new vinyl. This process lets contractors check the underlying wall structure for damage or decay. Any issues must be repaired before proceeding to ensure a strong, lasting installation. Removing old siding can take several days, depending on the house size and siding condition. The Process of Removing Existing Siding Installers carefully strip old siding without damaging the structural sheathing beneath. This step often involves prying panels loose and hauling away debris, which can be labor-intensive. Protecting the home’s framing during removal is critical to prevent costly repairs later. Checking for and Repairing Damage Once the old siding is removed, the contractor inspects the sheathing, insulation, and framing for signs of moisture damage, rot, or pests. Identifying and addressing these issues early prevents structural problems and extends the life of your new siding. Siding repairs may include replacing damaged wood, sealing gaps, or improving insulation. Preparing the Wall Surface for Vinyl Siding Installation Once the old siding is removed and repairs are completed, the wall surface must be adequately prepared. This preparation includes installing a weather-resistant barrier such as house wrap to protect against moisture intrusion. The sheathing itself may need to be replaced or reinforced to provide a flat, stable base. Proper preparation is critical for the siding to perform well and maintain its appearance over time. Inspecting and Replacing Sheathing Sheathing provides the foundation for siding panels, so it must be in excellent condition. If the existing sheathing is warped, cracked, or rotted, it will be removed and replaced to create a solid surface. This step ensures your new siding will lay flat and fasten securely. Applying a Weather-Resistant Barrier The house wrap or similar weather-resistant barrier protects against water infiltration, allowing trapped moisture to escape. This barrier helps prevent mold and wood rot inside the wall cavity. The barrier is carefully overlapped and sealed around windows and doors to maintain a continuous protective layer. Vinyl Siding Trim and Essential Accessories Before the siding panels are installed, trim pieces like corner posts, starter strips, and window casings are installed. These elements frame the siding and give it a finished, professional look. Properly installed trim also helps direct water away from vulnerable points, protecting the home from leaks. Adding Corner Posts and Starter Strips Corner posts cover the panel edges and create clean, polished corners that enhance your home’s appearance. Starter strips are installed along the bottom edge of walls to provide a secure base for the first row of siding panels. Both elements are crucial for structural integrity and visual appeal. Window and Door Trim Installation Trim around windows and door seals to fill gaps between siding and openings, preventing drafts and water intrusion. This trim adds architectural detail, helping your home look cohesive and well-maintained. Installers carefully measure and cut trim pieces to fit snugly for a seamless finish. How the Vinyl Siding

An aerial view of two workers replacing shingles on a roof.
Services

What Factors Influence the Cost of Roof Replacement in 2025

Replacing a roof is one of the most significant investments a homeowner can make, and in 2025, the variables affecting that cost are more nuanced than ever. Between labor shortages, material price fluctuations, climate-related building codes, and advanced roofing technologies, understanding the factors that contribute to the cost of roof replacement is crucial for making an informed decision. This blog breaks down the key factors influencing pricing in today’s roofing market, helping homeowners budget wisely and choose materials and services that suit both their property and their finances. Material Choice Heavily Impacts the Cost of Roof Replacement When it comes to roofing, material selection is the most immediate and influential factor in determining the total cost of roof replacement. Each material carries its own price point, expected lifespan, and installation complexity. Asphalt Shingles Remain the Budget-Friendly Standard Asphalt shingles remain the most popular roofing option due to their affordability and widespread availability. In 2025, standard three-tab shingles generally cost less than architectural shingles but have a shorter lifespan. Homeowners opting for asphalt can expect material costs to be relatively low, with total project costs varying depending on the roof size and layout. Premium Materials Increase Both Durability and Expense Those seeking long-term performance and upscale curb appeal often opt for premium options, such as metal, clay tile, or slate. These materials come at a higher initial cost but typically offer a much longer service life. Metal roofing, for instance, is energy-efficient and recyclable, while natural slate roofs can last more than 100 years. With these benefits come higher installation fees and specialized labor requirements, both of which contribute to the increased total cost of roof replacement. Emerging Green Technologies Affect Pricing Solar shingles and cool roofs—both designed for sustainability—are gaining traction in 2025. While they can reduce long-term energy costs, their upfront expenses are higher than those of traditional materials. Factoring in installation time, compatibility with existing systems, and future savings is essential when weighing these advanced options. Labor and Installation Complexity Raise the Cost of Roof Replacement The human element is another major factor in the cost of roof replacement. In 2025, labor markets across the construction sector are tight, with skilled roofers in high demand. Moreover, the complexity of your roof—both in its design and structural needs—can directly impact how much you’ll pay. Regional Labor Rates Continue to Vary Depending on where you live, the cost of labor can swing significantly. Urban areas with a higher cost of living typically have higher roofing labor rates, whereas rural regions often offer more competitive pricing. Weather patterns also play a role. In climates prone to seasonal roofing slowdowns, demand can surge during the dry season, further raising rates. Roof Pitch and Access Challenges Add Time and Cost A steeply pitched roof or one with multiple angles and dormers will increase labor time and safety precautions. If scaffolding, harness systems, or additional crew members are required, expect the price to rise. Likewise, if your home is difficult to access due to landscaping or location, these logistics may inflate the cost of roof replacement. Tear-Off vs. Layover Projects Whether your roofers need to remove the existing roof or can apply new materials over it makes a big difference in both labor intensity and disposal fees. Tear-off jobs take more time and generate more waste but are generally preferred for longevity. Layovers might reduce initial labor costs but can conceal underlying damage, leading to bigger expenses down the road. Roof Size and Shape Play a Role in the Cost of Roof Replacement It may seem obvious, but the sheer size and geometry of your roof are key factors in determining the total cost of roof replacement. The larger and more complex the roof, the more material and labor will be required. Larger Roofs Demand More of Everything More surface area means more shingles, underlayment, fasteners, flashing, and labor hours. Even relatively inexpensive materials can become costly when required in bulk. Additionally, large roofs often necessitate more safety equipment, higher insurance premiums for the crew, and extended project timelines. Multi-Level and Irregular Shapes Increase Labor Intensity Homes with multiple stories, intricate rooflines, or architectural details like skylights and chimneys require additional planning and cutting. These details not only increase labor time but also the potential for installation errors or the need for custom flashing and sealants. Permits and Building Codes Contribute to the Cost of Roof Replacement In 2025, increased attention to building safety and energy efficiency has led to more stringent permitting requirements and building codes. These regulations have a direct impact on the cost of roof replacement, particularly in regions affected by severe weather or prone to wildfires. Permit Fees Are Location-Dependent Most municipalities require permits for roof replacement projects. The cost of these permits varies widely and may be calculated based on factors such as project size, property value, or flat-rate fees. In some cities, streamlined digital permitting has made the process faster, but it remains no less costly. Code Upgrades Add to Material and Labor Costs Some regions now require Class A fire-rated roofing, hurricane straps, or impact-resistant shingles. While these improvements offer better protection, they also incur additional material and labor costs. If your existing roof is outdated or non-compliant, the new installation will need to be brought up to the current code, further increasing the cost of roof replacement. Underlying Structural Damage Elevates the Cost of Roof Replacement What lies beneath your roof can sometimes be the biggest unknown in any replacement project. If roofers uncover structural damage during the process, it will inevitably add to the cost of roof replacement. Rot, Mold, and Pests Drive Up Costs Hidden issues such as rotten decking, mold infiltration, or termite damage can significantly increase the scope of work. These problems require immediate attention to prevent future deterioration, which means the roofing crew may need to replace sheathing, rafters, or insulation before installing the new roof. Older Homes Pose Additional Risks Older homes may have structural quirks or outdated framing

A close-up view of rain gutter installation.
Siding Installation and Replacement

Rain Gutter Replacement and Home Value: What You Should Know

Most homeowners don’t think about their gutters until something goes wrong. But when it comes to protecting your home and boosting its value, they deserve more attention. Gutters may not be the flashiest feature, but they handle the mess that could ruin your foundation, siding, or landscaping. A worn-out system tells buyers something’s been neglected, even if the rest of the house looks fine. Swapping old gutters for a solid new setup isn’t just maintenance—it’s a smart way to protect what you’ve built. Why Rain Gutter Replacement Matters More Than You Think When people assess home value, they usually think big. But the small things often reveal how a home has been maintained. Gutters aren’t flashy but carry real weight regarding protection and appearance. Worn-out gutters may not seem urgent until they’ve caused thousands in repairs. Rain gutter replacement is often needed before it’s too late. Gutters Protect More Than Your Roof Gutters do more than carry water off the roof. They direct rain away from your home’s foundation. Without them, water can pool and seep into the basement, leading to mold, cracks, and costly structural problems. Replacing old gutters keeps that water moving safely away. Curb Appeal Isn’t Just About Paint and Plants Old gutters can negatively affect your home’s first impression. Rust, dents, and peeling paint make the place look neglected. Fresh gutters clean up the roofline and bring order to the edges. Buyers notice that kind of visual upkeep quickly. Rain gutter replacement improves both looks and function. How Rain Gutter Replacement Affects Home Value A cracked foundation or water-stained walls will hurt your asking price, often resulting from failed gutters. Fixing visible gutter damage can protect your home’s resale value and tell buyers that basic maintenance hasn’t been ignored. Rain gutter replacement is one upgrade that protects your investment and keeps your home competitive. Inspectors Look for Signs of Water Issues Home inspectors notice signs of neglect during a sale. Sagging or leaky gutters are immediate red flags. They often signal deeper water damage below the surface. Buyers worry that a bad gutter means mold or foundation issues. A new system removes that concern entirely. Small Investments Can Bring Bigger Returns The gutter replacement doesn’t carry the cost of a kitchen redo. But it can still bump your home’s value at closing. It’s a low-cost move that signals close attention to detail. Buyers know it’s one less repair they’ll need to make. That can make your listing more attractive than others. When You Should Consider Rain Gutter Replacement Gutters rarely fail all at once. Instead, they wear down slowly until real problems show up. Knowing when to replace them helps you avoid surprise repairs. Timing is everything, and so is staying ahead of weather damage. These signs will tell you when it’s time to act: Visual Wear and Functional Problems If your gutters have cracks or rust, they need replacing. Sagging or pulling away from the roof is another sign. Water spilling over the sides during rain shows they’re not draining right. You might also see peeling paint or stains near the base of your home. These are all signs that the system isn’t doing its job. After Major Storms or Harsh Seasons Storms can break or shift your gutters without you noticing. Hail dents them, heavy snow weighs them down, and winds loosen brackets. After a rough season, check the system for damage. Even minor issues can lead to long-term water problems, and acting fast can prevent that. Choosing the Right Rain Gutter Replacement for Your Home Choosing the wrong type of gutter can cost you in repairs and appearance. Material, shape, and color all play a role in function and design. You want something that works for your weather and fits your home style. Not all gutters are created equal; some choices last longer than others. Picking the right system means fewer issues later on. Materials Make a Big Difference Aluminum gutters are popular because they don’t rust and are lightweight. They’re easy to install and cost-friendly for most homes. Copper is more expensive but adds class and lasts for decades. Vinyl is the budget choice, but it cracks in extreme temperatures. Steel is strong but needs a coating to prevent rust over time. Style and Function Should Match Your Home K-style gutters hold more water and best suit newer homes. Half-rounds are often used for older or historic properties. Seamless gutters give a smooth look and reduce leak points. You’ll also find different sizes depending on rainfall levels. Picking a style that suits your roof keeps water flowing where it should. Professional Installation vs. DIY Rain Gutter Replacement Trying a gutter project yourself is tempting, especially with all the online how-to videos available. But the details matter more than you might think. A slight slope mistake can cause overflow and damage. While DIY can save upfront costs, it often leads to expensive fixes later. Knowing when to call a pro can save you money in the long run: When It’s Worth Hiring a Pro Professional roofers know the exact slope gutters need to drain correctly. They also check your fascia and soffits for hidden issues. Installers bring the right tools to cut and fit gutters correctly. You’ll get a clean, finished look that holds up over time. That kind of work adds confidence for future buyers, too. Risks of Doing it Yourself Ladder work is dangerous, especially on two-story homes. Misjudging a slope or unevenly hanging it causes water problems. DIY gutters often leak where sections join together. Mistakes might not show until your next big storm. At that point, the siding or foundation damage can cost far more than a professional job. Maintenance After Rain Gutter Replacement Even brand-new gutters can fail if they’re neglected. Just because they’re new doesn’t mean they don’t need attention. Regular upkeep helps them last longer and work better. Clean gutters protect everything beneath them—your siding, landscaping, and even the basement. A little effort goes a

A roof repair specialist in a blue hard hat smiles at the camera after finishing his task.
Roof Repairs & Replacement

What Does a Roof Repair Specialist Do?

A roof repair specialist handles inspections, fixes leaks, restores damaged materials, and reinforces structural integrity to protect homes. Addressing minor issues early prevents costly replacements and extends a roof’s lifespan. Proper sealing, flashing repairs, and shingle replacements help maintain durability against weather damage. On the other hand, emergency services ensure quick solutions for storm-related problems, while preventive maintenance recommendations keep future repairs manageable. Skilled specialists also improve energy efficiency by enhancing insulation and ventilation. Understanding a Roof Repair Specialist’s Responsibilities A roof repair specialist ensures roofs remain durable by performing inspections, repairs, and maintenance. Immediately addressing damages prevents expensive replacements and protects the structure from further deterioration. Fixing leaks, reinforcing weak areas, and restoring worn-out materials help maintain a roof’s strength. Emergency repairs and preventive solutions keep homes safe from unexpected roofing failures. Conducts Roof Inspections A roof repair specialist inspects roofs to help identify leaks, damaged shingles, and weak structural components. Spotting minor issues before they escalate prevents costly repairs and extends the roof’s lifespan. They also evaluate flashing, underlayment, and ventilation to ensure the system functions properly. Providing detailed assessments allows homeowners to plan necessary maintenance and improvements. Repairs Leaks and Water Damage Fixing leaks prevents moisture from seeping into the structure and causing mold growth. A roof repair specialist replaces damaged underlayment and seals cracks to protect the interior from water damage. Addressing weak spots in roofing materials strengthens the overall structure. Ensuring proper drainage reduces the risk of future leaks and deterioration. Replaces and Restores Roofing Materials A roof repair specialist repairs or replaces missing shingles to maintain the roof’s appearance and functionality. They also restore flashing and sealants to prevent moisture from penetrating through vents and chimneys. Securing loose tiles or panels prevents wind and storm damage. Using durable materials enhances the roof’s resistance to weather conditions. Reinforces Roof Structure A roof repair service can strengthen rafters and trusses, preventing sagging and structural instability. The roof can withstand heavy loads and harsh weather by repairing weak areas. Reinforcing the framework increases the roof’s lifespan and reduces the need for frequent repairs. Keeping the structure secure protects the home from long-term damage. Provides Emergency and Preventive Maintenance A roof repair company can handle emergency repairs, minimizing damage after storms, leaks, or sudden roofing failures. A repairman applies quick fixes to prevent further deterioration until full repairs can be completed. Recommending maintenance schedules helps homeowners avoid significant roofing issues. Regular inspections and minor repairs extend the roof’s lifespan and reduce long-term costs. Improving Roof Ventilation and Insulation Poor ventilation traps heat and moisture, leading to premature roof damage. A professional roof repair man installs or repairs vents to improve airflow and regulate temperature. Proper insulation prevents energy loss and reduces strain on HVAC systems. Enhancing ventilation and insulation extends the roof’s durability. AddressesMold and Algae Growth Moss, algae, and mold weaken roofing materials and trap moisture. These issues can occur at any time, so regularly removing growth with the help of a roof repairman prevents deterioration and extends the roof’s lifespan. Specialists apply treatments to inhibit future buildup and protect shingles. Preventing biological growth reduces the risk of interior mold issues and roof rot. Enhances Roof Drainage Systems Poor drainage leads to water pooling and premature material deterioration. Cleaning gutters, downspouts, and scuppers is essential to ensure proper water flow. Installing additional drainage solutions prevents water from accumulating on flat or low-slope roofs. Maintaining efficient drainage reduces the risk of leaks and structural damage. Signs You Need a Roof Repair Specialist Right Away  Roofing problems require expert assessment to prevent costly damage and safety risks. Improper repairs or temporary fixes often lead to more severe structural issues over time. A roof repair specialist ensures that complex roofing problems are handled with the proper techniques and materials. Severe Storm Damage High winds, hail, and heavy rainfall cause extensive roof damage, weakening the structure. Missing shingles, torn flashing, and punctured roofing materials expose the home to leaks and interior damage. Identifying hidden storm-related issues prevents long-term deterioration. Reinforcing damaged areas and replacing compromised materials restore the roof’s protective function. Structural Weakness and Sagging A sagging roof indicates underlying issues with support beams, rafters, or water-damaged decking. Excessive weight from snow, debris, or previous repairs contributes to instability. Strengthening the structure prevents further sagging and reduces the risk of collapse. Replacing weakened components ensures the roof can withstand long-term environmental stress. Persistent and Hard-To-Find Leaks Leaks often originate from compromised flashing, deteriorated underlayment, or hidden cracks. If left unaddressed, water infiltration damages insulation, ceilings, and walls. Identifying the exact source requires specialized tools and expertise. Sealing leaks properly and replacing affected materials prevents future water-related damage. Poor Ventilation and Heat Retention Inadequate ventilation traps heat and moisture, accelerating roof deterioration. Excessive heat causes shingles to warp and underlayment to weaken. Proper airflow regulation prevents mold growth and extends the roof’s lifespan. Installing or repairing ventilation systems improves energy efficiency and overall roof performance. Advanced Flashing and Chimney Repairs Flashing around vents, chimneys, and skylights deteriorates, leading to leaks. Improperly sealed joints allow moisture to penetrate the roof’s interior. Repairing or replacing flashing prevents water intrusion and structural damage. Securing these vulnerable points ensures long-term weather resistance and durability. How a Roof Repair Specialist Fixes Shingle and Tile Repair Shingles and tiles protect the roof from weather damage, but cracks, missing pieces, and loose materials compromise their effectiveness. A roof repair specialist ensures these problems are fixed correctly to prevent leaks and structural damage. They use precise methods to replace damaged materials, secure loose sections, and reinforce weak areas to restore the roof’s durability. Proper installation and maintenance can keep the roof functional and visually appealing for years. Inspects the Damaged Area A roof repair specialist examines the roof and helps locate missing, cracked, or misaligned shingles and tiles. The specialist also identifies the extent of the damage and ensures the right materials and repair techniques are used. Assessing the surrounding structure prevents hidden issues from being overlooked. A detailed

Scroll to Top